
If you’re a smart home enthusiast looking to integrate your myQ devices with Apple HomeKit, you’re in the right place. MyQ, a smart garage door opener, can bring your home automation system to life by offering easy control over your garage doors and other devices. However, setting up myQ devices with HomeKit requires a few steps, which might seem complicated for some users.
In this guide, we will walk you through the process of connecting your myQ devices to Apple HomeKit, the benefits of doing so, and some common troubleshooting tips. Whether you are using official HomeBridge hardware, third-party devices, or software-based solutions like HomeBridge or HOOBS, we’ve got you covered.
Main Methods to Add myQ Devices to Apple HomeKit
There are several ways to connect your myQ devices with HomeKit. Each method has its own pros and cons, so it’s important to choose the one that best fits your needs.
Official Chamberlain HomeBridge Device
Chamberlain, the maker of myQ, offers a HomeBridge device that makes myQ devices compatible with HomeKit. This device allows you to control your garage door openers through the Apple Home app.
Software Solutions (HomeBridge and HOOBS)
If you don’t want to buy the official HomeBridge device, you can use software-based solutions like HomeBridge or HOOBS. These are open-source platforms that enable you to connect non-HomeKit devices to Apple’s smart ecosystem.
Third-Party Smart Garage Door Openers
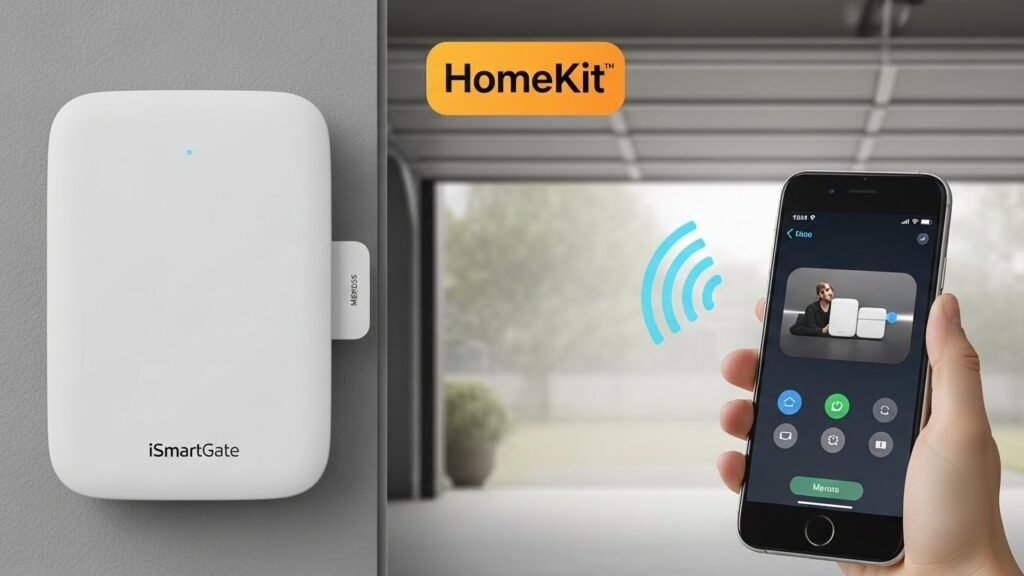
Another option is to use third-party smart garage door openers that are already compatible with HomeKit. Devices like iSmartGate and Meross provide a simple alternative to integrating your garage door with HomeKit without needing a bridge.
Official HomeBridge Device Setup
Support Status and Limitations
The official HomeBridge device is designed specifically to integrate myQ garage door openers with Apple HomeKit. However, it’s important to note that the device is no longer actively supported by Chamberlain, which can lead to some functionality issues down the line. The device is compatible with all myQ devices, but users may experience inconsistent performance due to software updates or iOS compatibility issues.
Step-by-Step Setup for HomeBridge
- Prepare your device and network: Ensure your iPhone or iPad is connected to the right Wi-Fi network. It’s important to use a 2.4 GHz network for the best performance.
- Install the MyQ app: Open the MyQ app on your phone and sign in or create a new account if you haven’t done so already.
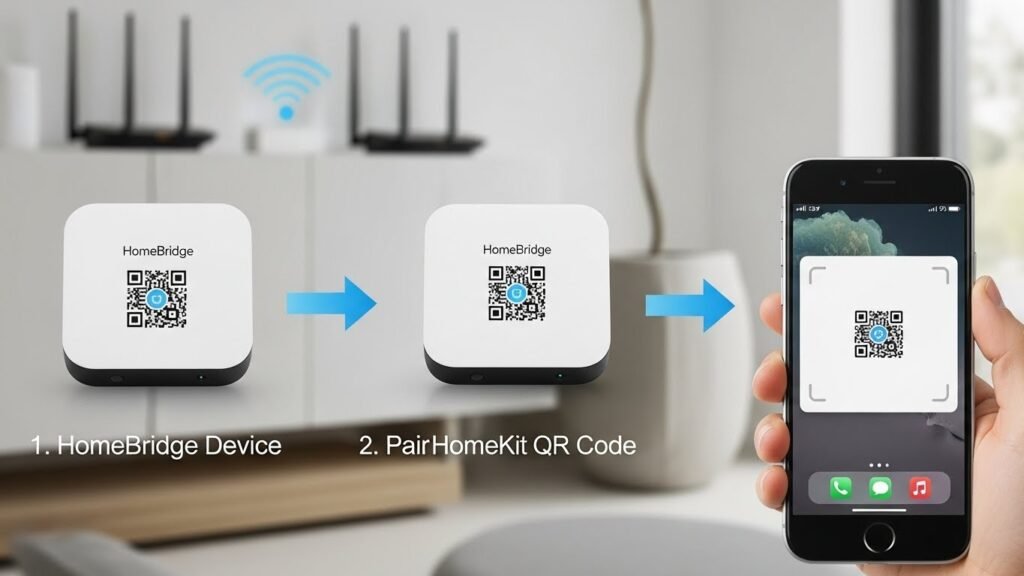
- Pair the HomeBridge device with HomeKit: Scan the HomeKit QR code located on your HomeBridge device. This will initiate the pairing process with the Home app on your iOS device.
- Add Devices: Once paired, you’ll need to add your myQ devices, such as garage doors and sensors, to the Home app. You’ll be prompted to name each device and assign it to a specific room in your smart home setup.
Advantages and Disadvantages of HomeBridge
Advantages:
- Easy setup process for myQ devices.
- Works with all myQ devices, making it a reliable option.
- Official product with dedicated support (though discontinued now).
Disadvantages:
- Limited support and updates from Chamberlain.
- Compatibility issues with newer iOS versions.
- Performance may degrade over time due to software issues.
Using Software Solutions to Connect MyQ Devices to HomeKit
Overview of HomeBridge and HOOBS
If you don’t want to rely on the official HomeBridge hardware device, there are software alternatives available. Both HomeBridge and HOOBS allow you to connect non-HomeKit devices to Apple HomeKit. These solutions are perfect for users who are comfortable with a bit of technical setup.
HomeBridge:
HomeBridge is an open-source platform that enables non-HomeKit devices, like myQ, to be controlled through the Home app. It requires a computer or a Raspberry Pi to run and can be configured using plugins.
HOOBS:
HOOBS is a more user-friendly version of HomeBridge. It’s a plug-and-play device that simplifies the process of integrating non-HomeKit devices into HomeKit. HOOBS offers the same functionality as HomeBridge but with a more straightforward setup.
Setup Process for HomeBridge
- Install HomeBridge: Begin by downloading HomeBridge on your computer or Raspberry Pi.
- Install MyQ Plugin: Use the HomeBridge UI or command line to search for and install the myQ plugin.
- Configure the Plugin: Once the plugin is installed, you’ll need to update the configuration file (config.json) with your myQ account credentials.
- Pair with HomeKit: Open the Home app, scan the HomeKit setup code, and add your myQ devices.
Setup Process for HOOBS
- Install HOOBS: Plug in the HOOBS device and connect it to your network.
- Install MyQ Plugin: From the HOOBS interface, search for and install the myQ plugin.
- Configure the Plugin: Enter your myQ credentials in the configuration settings.
- Pair with HomeKit: Use the Home app to scan the QR code and add your devices to HomeKit.
Advantages and Disadvantages of Using Software Solutions
Advantages:
- Flexibility: You can integrate any device with HomeKit, not just myQ.
- No need for official HomeBridge hardware.
- HOOBS is easier to set up compared to HomeBridge.
Disadvantages:
- Requires some technical knowledge, especially when using HomeBridge.
- Frequent updates and maintenance may be needed.
- Sometimes reliability issues with myQ’s API may affect functionality.
Using Third-Party Smart Garage Door Openers
Why Choose Third-Party Smart Openers for HomeKit?
If you want a hassle-free setup, third-party smart garage door openers like iSmartGate and Meross offer an alternative to myQ devices. These openers are already HomeKit-compatible and don’t require additional devices or complex setup procedures.
Recommended Third-Party Devices
- iSmartGate: This device works seamlessly with myQ garage doors and can be easily integrated with Apple HomeKit.
- Meross Smart Wi-Fi Opener: Affordable and reliable, Meross also offers easy HomeKit integration, along with Alexa and Google Assistant compatibility.
Setup Process for Third-Party Openers
- Select Compatible Openers: Choose from iSmartGate or Meross for reliable HomeKit integration.
- Install and Connect: Follow the installation guide for your chosen opener, which typically involves connecting it to your Wi-Fi network.
- Pair with HomeKit: Use the Home app to scan the setup code or follow on-screen instructions to add your opener.
Benefits and Challenges of Using Third-Party Openers
Benefits:
- Easy and quick setup.
- Cost-effective, especially for users who don’t want to deal with complex configurations.
- Reliable HomeKit integration without the need for additional bridges.
Challenges:
- Limited compatibility with some older garage door models.
- May not have all the advanced features that myQ offers, such as detailed scheduling or real-time alerts.
Troubleshooting Tips for Common MyQ HomeKit Integration Issues
Integrating myQ devices with Apple HomeKit can be a smooth process, but sometimes issues arise. Whether it’s connectivity problems, device pairing issues, or trouble with the MyQ app, it’s important to know how to troubleshoot effectively.
Device Pairing Issues
One of the most common issues when integrating myQ with HomeKit is the inability to pair devices properly. If you are unable to connect your myQ garage door opener to HomeKit, here are a few things you can try:
- Ensure Wi-Fi is stable: Make sure your iPhone and the myQ device are on the same Wi-Fi network, preferably a 2.4 GHz network for better compatibility.
- Check the HomeBridge or HOOBS connection: If you are using HomeBridge or HOOBS, confirm that both are properly configured and connected to your network.
- Verify the accessory code: Double-check that you are entering the correct HomeKit setup code. Without this, the pairing process cannot proceed.
Compatibility Issues
Older myQ devices or certain models may not support HomeKit natively. To solve compatibility issues:
- Check device models: Refer to the myQ compatibility list to see if your model is supported. If your garage door opener is not compatible with HomeKit, consider using third-party solutions like iSmartGate or Meross.
- Use HomeBridge or HOOBS: If your device is not directly compatible, HomeBridge or HOOBS can help bridge the gap by making your non-HomeKit devices work with Apple’s ecosystem.
Firmware and Software Updates
Keeping your devices and software up-to-date is essential for smooth operation:
- MyQ app updates: Ensure you have the latest version of the MyQ app. Outdated versions may cause functionality issues with HomeKit.
- HomeKit firmware updates: Similarly, check that your Apple devices (iPhone, iPad, or HomePod) are running the latest iOS version to avoid compatibility issues.
Rebooting Devices
Sometimes, a simple reboot can resolve many common issues:
- Reboot your myQ device: Unplug the myQ device for 30 seconds and then plug it back in to reset its connection.
- Restart HomeKit hub: If you’re using an Apple TV, HomePod, or iPad as your HomeKit hub, try restarting it to refresh the connection.
- Reboot your router: If connectivity issues persist, reboot your Wi-Fi router to ensure a stable internet connection.
HomeKit Setup Code Issues
Sometimes the HomeKit setup code, which is necessary for pairing devices, can be difficult to scan or input correctly. Here’s what you can do:
- Manually enter the code: If scanning the QR code doesn’t work, try manually entering the 8-digit setup code provided by the myQ device or HomeBridge.
- Check the placement of the QR code: Ensure that the code is clearly visible on the HomeBridge or myQ device.
How to Control MyQ Devices in HomeKit
Now that your myQ devices are successfully integrated with HomeKit, it’s time to explore the various ways you can control them. Apple’s Home app, combined with Siri voice commands, provides an intuitive way to manage your smart garage door openers and other devices.
What You Can Control with MyQ Through HomeKit
Once your myQ device is connected to HomeKit, you can control it in several ways using the Home app or Siri:
- Open/close your garage doors: Control the opening and closing of your garage doors from your iPhone or iPad.
- Check the status of your garage door: See whether your garage door is open or closed from anywhere.
- Set schedules: You can schedule specific times for your garage door to open or close automatically.
- Control other devices: If you’ve connected other smart devices to HomeKit, you can control them in conjunction with your myQ devices. For example, you can open your garage door and turn on the lights in your garage at the same time.
How to Control Multiple MyQ Devices in HomeKit
Managing multiple devices through HomeKit is easy. The Home app allows you to group multiple myQ devices and other smart devices into “Scenes” or “Automations,” so you can control them all at once.
- Create Scenes: A scene is a set of actions you can trigger with one command. For example, you can create a scene that opens your garage door, turns on your garage lights, and sets the thermostat to a comfortable temperature.
- Set Automations: Automations allow you to create triggers for your devices. For example, you can set an automation that opens your garage door when your iPhone connects to your home Wi-Fi network.
How to Unlink MyQ Devices from HomeKit
If you decide to disconnect your myQ devices from HomeKit, the process is fairly simple. Here’s how to unlink myQ from HomeKit:
- Open the MyQ app: Launch the app on your mobile device.
- Go to Settings: Tap on the settings icon (usually a gear or menu option).
- Select Partner Integrations: Look for the “Partner Integrations” section, where you will find HomeKit listed as one of the integrations.
- Unlink Account: Tap on the option to unlink your HomeKit account, and confirm the action when prompted.
Once you unlink your devices, they will no longer be controllable through the Home app or Siri. If you plan to reconnect them later, simply follow the setup process again.
Compatibility of MyQ Devices with Apple HomeKit
Before starting the integration, it’s important to ensure your myQ devices are compatible with Apple HomeKit. Not all myQ models work seamlessly with HomeKit, and some may require additional hardware or software to function correctly.
MyQ Device Compatibility with HomeKit
- MyQ Garage Door Openers: Most of the newer myQ garage door openers are compatible with HomeKit. However, older models may not work without additional hardware, such as a HomeBridge device.
- Compatibility Check: Always check the compatibility of your specific model on the myQ website before attempting integration.
Will MyQ Be Matter-Compatible?
Currently, myQ devices are not compatible with the Matter protocol. Matter is a new standard for smart home devices that aims to make them universally compatible across different ecosystems like Apple, Amazon, and Google. There’s a possibility that myQ devices will support Matter in the future, but as of now, it’s not supported.
Advanced Control Features with MyQ and HomeKit
Now that your myQ devices are set up with Apple HomeKit, you can enjoy advanced control features. These features make it easier to manage your devices and enhance the convenience of your smart home.
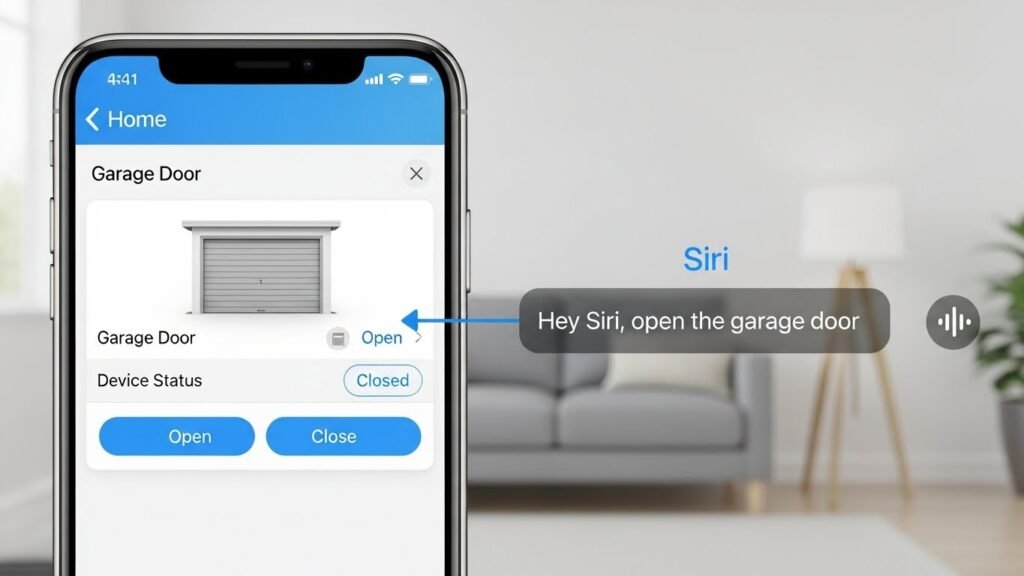
Open/Close Your Garage Door with Siri
Once your myQ devices are connected to HomeKit, you can control them through Siri. This means you can open or close your garage door hands-free using simple voice commands.
For example:
- “Hey Siri, open the garage door.”
- “Hey Siri, close the garage door.”
This feature is ideal when you’re arriving home with your hands full or leaving and don’t want to reach for your phone.
Monitor the Status of Your Garage Door
In addition to controlling your garage door, you can monitor its status in real-time. With HomeKit, you can check if your garage door is open or closed from anywhere.
- Home app: Open the Home app on your iPhone or iPad and check the status of your garage door.
- Notifications: Set up notifications to alert you when the door is opened or closed, or if it remains open for too long.
Set Automations for Your MyQ Devices
With HomeKit, you can create automations that control your myQ devices based on specific triggers. For example, you can automatically open your garage door when you arrive home.
- When arriving home: Set your garage door to open as soon as your iPhone connects to your home Wi-Fi.
- Time-based automations: Set your garage door to close at a specific time each night, ensuring your home stays secure even if you forget.
- Home status-based automations: Open your garage door when your Home app detects you are home.
Grouping Devices in the Home App
If you have multiple myQ devices or other smart home devices, you can group them into scenes or automations for more efficient control.
- Create Scenes: A scene is a group of actions you can perform at once. For example, create a “Leaving Home” scene that closes your garage door, locks your doors, and turns off the lights.
- Automate Actions: Set your myQ devices to trigger other smart devices. For example, set your garage door to open when you turn on your porch lights.
Alternatives to Chamberlain myQ for HomeKit Integration
While myQ devices are popular for smart garage door control, there are several alternatives that may offer easier or more reliable integration with Apple HomeKit. If you’re facing issues with myQ devices or want to explore other options, consider these alternatives for a smoother experience.
iSmartGate: A Smart Alternative
iSmartGate is an excellent third-party smart garage door opener that works seamlessly with HomeKit. It supports both Chamberlain and LiftMaster models, making it a viable alternative for those who want a quick setup without dealing with the limitations of myQ.
Features:
- Works with both Apple HomeKit and other ecosystems like Google Assistant and Alexa.
- Offers real-time notifications when the garage door is opened or closed.
- Allows users to control and monitor the garage door from anywhere through the iSmartGate app.
Benefits:
- Easy Integration: No need for additional hardware like HomeBridge or HOOBS.
- Compatibility: Works with multiple garage door opener brands, not just myQ.
- Reliable: Fewer compatibility issues and better support.
Meross Smart Wi-Fi Opener: Affordable and Reliable
Meross offers a budget-friendly option for those looking to add smart functionality to their garage doors without breaking the bank. Meross Wi-Fi openers are compatible with HomeKit, Alexa, and Google Assistant, making them an ideal choice for users who need simple integration.
Features:
- Works with a wide range of garage door models.
- Compatible with HomeKit for easy control through the Home app and Siri.
- Affordable pricing for users on a budget.
Benefits:
- Affordable: Cheaper than other HomeKit-compatible garage door openers.
- Easy Setup: Quick installation with the Meross app and seamless pairing with HomeKit.
- Smart Features: Includes scheduling, notifications, and real-time status monitoring.
Other Smart Openers to Consider
- LiftMaster MyQ (aftermarket): If you already have a LiftMaster garage door opener, you can opt for the LiftMaster MyQ upgrade kit to make it HomeKit-compatible.
- Baldwin Garage Door Opener: A lesser-known brand that offers HomeKit compatibility and easy setup.
- Chamberlain Smart Garage Hub: Another Chamberlain product that integrates with HomeKit without requiring a separate bridge.
Final Thoughts on Choosing the Right Solution
When it comes to adding smart functionality to your garage doors and integrating with Apple HomeKit, there are several paths to take. While myQ devices offer a solid solution, users may encounter challenges related to compatibility, discontinued products, or technical issues. In such cases, third-party solutions like iSmartGate and Meross can offer an easier, more reliable integration with HomeKit.
Here’s a summary of your options:
- myQ HomeBridge: Official solution, but limited in support and compatibility.
- HomeBridge & HOOBS: Ideal for advanced users who want to integrate non-HomeKit devices with Apple’s ecosystem.
- Third-Party Openers: Simple, cost-effective alternatives like iSmartGate and Meross that work with HomeKit right out of the box.
Ultimately, your choice depends on your current setup, budget, and whether you prefer a plug-and-play solution or don’t mind a more hands-on approach with software-based integration.
Conclusion
Integrating myQ devices with Apple HomeKit unlocks a new level of convenience and automation for your garage door openers and other smart devices. While the official HomeBridge device offers a simple setup, third-party solutions like iSmartGate and Meross provide even more flexibility and reliability for your smart home.
Whether you choose to go with HomeBridge, HOOBS, or a third-party opener, each solution has its own set of advantages. With this guide, you now have the tools to make an informed decision and enhance your smart home experience. Happy automating!
FAQs
Can I Use MyQ Devices with Siri?
Yes, once integrated with HomeKit, you can control your myQ devices using Siri voice commands. For example, you can say, “Hey Siri, open the garage door” or “Hey Siri, close the garage door.”
What Are the Key Benefits of Adding MyQ to HomeKit?
Adding myQ to HomeKit gives you the ability to control your garage door remotely through the Home app, set up automation, monitor the status of your garage door, and use Siri for hands-free control.
How Do I Reconnect MyQ to HomeKit If It’s Disconnected?
If your myQ device gets disconnected from HomeKit, you can reconnect it by opening the Home app, selecting “Add Accessory,” and scanning the HomeKit setup code. If that doesn’t work, check your Wi-Fi settings and ensure the device is within range of the network.
Will MyQ Ever Support Matter?
Currently, myQ devices do not support the Matter protocol. However, there are hopes that future updates may bring Matter support to myQ devices, enhancing compatibility with other smart home ecosystems like Amazon Alexa and Google Assistant.
How Do I Add Multiple MyQ Devices to HomeKit?
Once your first myQ device is connected to HomeKit, you can easily add additional devices by selecting “Add Accessory” in the Home app and following the on-screen instructions. Group devices together for easier control and management.
Sure! Here’s a dedicated FAQ section with questions and answers that are related to the topic but were not covered in the main content:
How Do I Reset My MyQ Device?
If your myQ device is not responding, you can reset it to troubleshoot any issues:
- Unplug the device: Disconnect your myQ device from the power source for 30 seconds.
- Plug it back in: Reconnect the device to the power source.
- Press and hold the reset button: For some models, there is a reset button that you must press and hold for 10-15 seconds.
- Reconfigure the device: After resetting, follow the steps to reconnect your device to your network and HomeKit.
Can I Use MyQ Without HomeKit?
Yes, you can still use myQ devices without HomeKit, but you’ll need the MyQ app for controlling and managing your garage door. Without HomeKit, you won’t be able to control it via the Home app or Siri, but the myQ app offers many features like:
- Opening/closing the garage door remotely.
- Setting alerts for door status.
- Scheduling automatic door operations.
Why Isn’t My MyQ Device Connecting to Wi-Fi?
If your myQ device isn’t connecting to Wi-Fi, try these solutions:
- Check Wi-Fi signal: Ensure the Wi-Fi signal is strong in the area where the device is installed. If the signal is weak, consider moving your router closer to the device or using a Wi-Fi extender.
- Use the 2.4 GHz band: MyQ devices work best on a 2.4 GHz network. If your router is set to 5 GHz, switch it to 2.4 GHz for better compatibility.
- Reboot your router: Sometimes a simple router reboot can resolve connectivity issues.
- Reset the device: If nothing else works, reset the device as mentioned earlier and reconnect.
Can I Integrate MyQ with Amazon Alexa or Google Assistant?
Yes, although myQ does not support native integration with Alexa or Google Assistant, you can use third-party platforms like IFTTT (If This Then That) to bridge the gap. By using IFTTT, you can create applets that allow Alexa or Google Assistant to control your myQ devices, including opening and closing your garage door.
How Do I Set Up Multiple MyQ Devices in One HomeKit Account?
Setting up multiple myQ devices in one HomeKit account is easy:
- Open the Home app: On your iPhone or iPad.
- Add the first device: Follow the setup process for the first device using the HomeKit code or QR code.
- Add additional devices: After the first device is added, tap “Add Accessory” again in the Home app and scan the HomeKit setup code for each subsequent myQ device.
You can group multiple myQ devices into scenes or rooms for easier management.
Does MyQ Support Multi-User Access?
Yes, myQ supports multi-user access, allowing you to share access with other family members or users. This feature enables other users to control the garage door from their own devices.
- Add family members: You can add up to 10 additional users through the MyQ app. Each user must have a MyQ account.
- Grant permissions: Control what each user can do, such as opening/closing doors or receiving alerts.
Can I Control MyQ with Apple Watch?
Yes, once your myQ device is integrated with HomeKit, you can control your garage door through the Apple Watch. Simply open the Home app on your Apple Watch and control your myQ device just like you would on your iPhone.
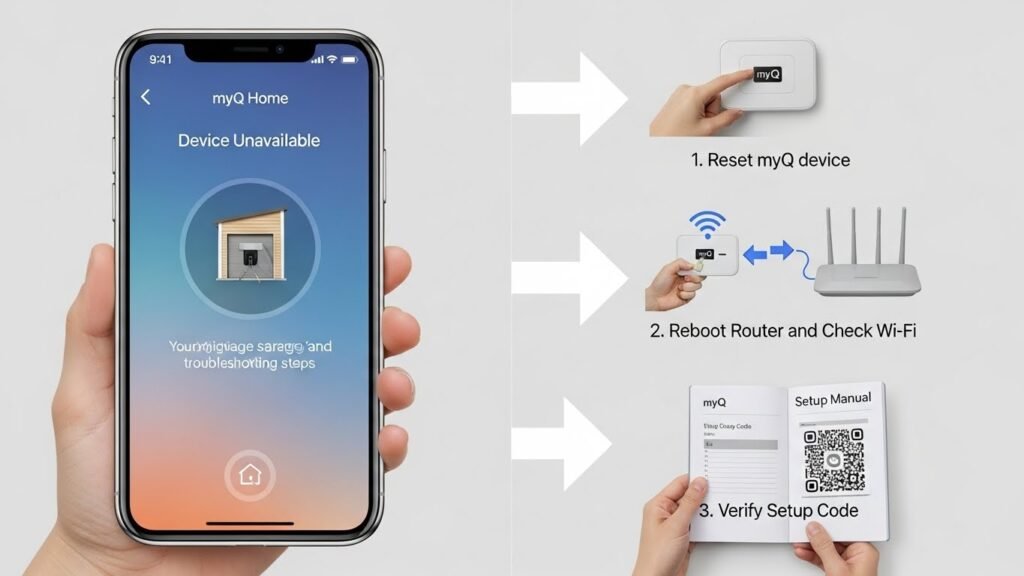
Why Does My MyQ Device Show as “Unavailable” in HomeKit?
If your myQ device appears as “Unavailable” in the Home app, try the following solutions:
- Check your Wi-Fi connection: Ensure that the device and your HomeKit hub are on the same network.
- Reboot the HomeKit hub: Restart your Apple TV, HomePod, or iPad that’s acting as the HomeKit hub.
- Check for MyQ outages: Sometimes, server issues on the myQ side may cause temporary unavailability. You can check for any known outages on the myQ status page.
How Do I Update My MyQ Device’s Firmware?
Firmware updates ensure your myQ device is running the latest software and features. To update:
- Open the MyQ app: Go to your device settings in the app.
- Check for updates: If a firmware update is available, the app will prompt you to update.
- Follow the instructions: Ensure your device is connected to Wi-Fi during the update process.
Firmware updates are essential for ensuring compatibility with the latest features and resolving bugs.
Is MyQ HomeKit-Compatible for All Devices?
Not all myQ devices are compatible with HomeKit. To confirm compatibility, check the product details for your specific myQ device. Newer models are more likely to support HomeKit, but older models may require third-party solutions like HomeBridge or HOOBS to work with Apple HomeKit.
How Can I Set Up MyQ to Close the Garage Door Automatically at a Certain Time?
You can set up an automation in the Home app to close your garage door at a specific time:
- Open the Home app: Tap the “+” icon to add a new automation.
- Set the trigger: Choose “A Time of Day Occurs” and set the desired time.
- Select actions: Choose the action to close your garage door and save the automation.
This feature helps you automatically secure your garage door without manual intervention.