
Do you have a boring old concrete patio that looks like a gray slab? You are not alone because many folks have the same issue. It is time to flip the script and fix that drab space. This guide shows you how to rock your outdoor patio flooring over concrete. We will talk about cool designs and easy ways to do it yourself. Get ready to turn that cement slab into a total outdoor oasis.
The Evolution of the Concrete Patio: Why Upgrade Your Space?
Old school patios were just flat pieces of gray cement. They worked for a while, but they are not very pretty to look at. Now, people want their backyards to feel like a part of the house. Moving beyond the slab means making your yard look like a real room. You can add style and flair that a plain floor just cannot give you.
Beyond the Slab
- Total Makeover: You can change an industrial floor into a warm and cozy spot for friends.
- Style Points: New flooring adds a level of design that makes your home stand out.
- Outdoor Living: Your patio becomes a place where you actually want to hang out.
The Comfort Factor
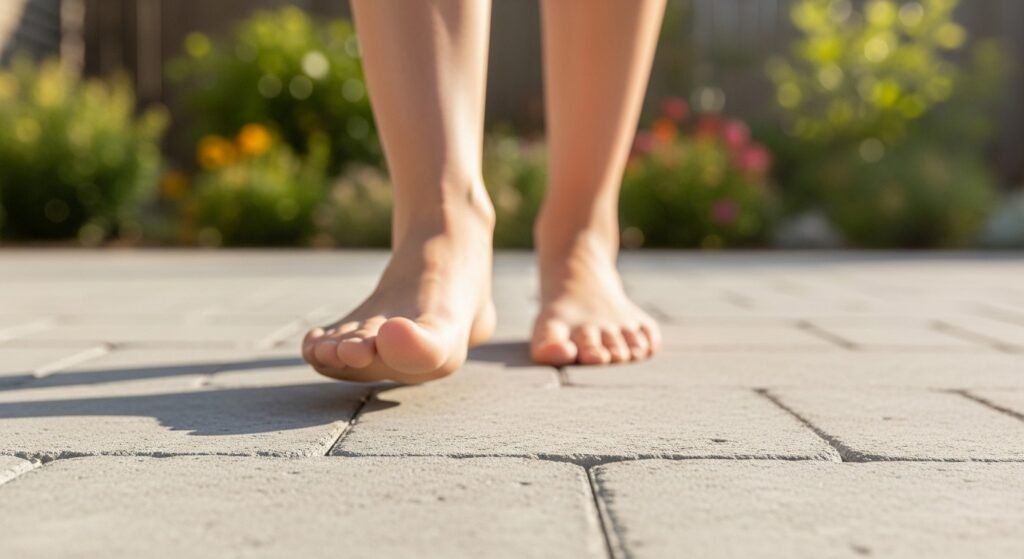
Concrete gets super hot in the summer sun. It can burn your feet when you walk out to grab a drink. Moving to better outdoor patio flooring over concrete makes things bare-foot friendly. These new materials do not soak up heat like stone or cement. They feel much softer and nicer for your toes. You can walk around without shoes and feel totally fine.
Value Addition
A nice patio is a huge win for your home value. If you ever sell your house, a pretty backyard makes people want to buy it. It adds curb appeal that catches everyone’s eye from the start. A finished floor looks expensive even if you did it on a budget. It shows you take good care of your home. This is a smart move for your wallet in the long run.
The Drab to Fab Transformation
Let’s be real, old concrete can look a bit cringe-worthy. It gets cracks and stains that never seem to go away. Covering it up is the best way to hide those ugly spots. You can go from a boring gray floor to a wood or stone look in a day. It is like a magic trick for your backyard renovation. Your friends will be shocked when they see the new look.
Selecting the Right Flooring Material for Concrete Overlays
Choosing the right stuff is the first big step. You want something that lasts but is easy to put down. There are many options out there for your DIY project. You need to think about how much work you want to do. Some systems are like putting a puzzle together. Others might take a bit more time to get just right.
Composite Deck-a-Floor Systems
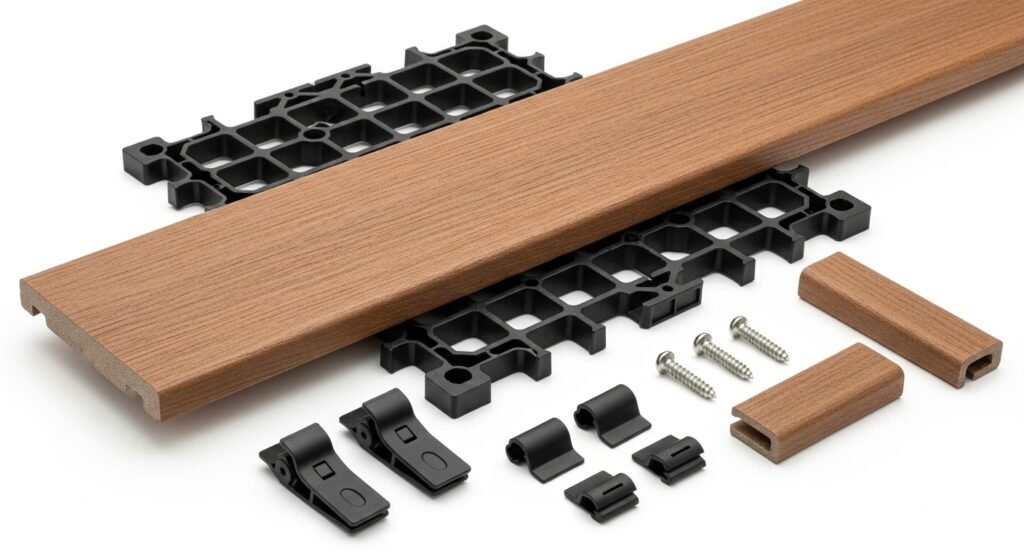
- Tough Stuff: These are made of wood and plastic mixed together for extra strength.
- Long Lasting: They do not rot or warp like real wood often does.
- Cool Look: You get the vibe of a real deck without all the heavy building.
Resilient Paver Systems
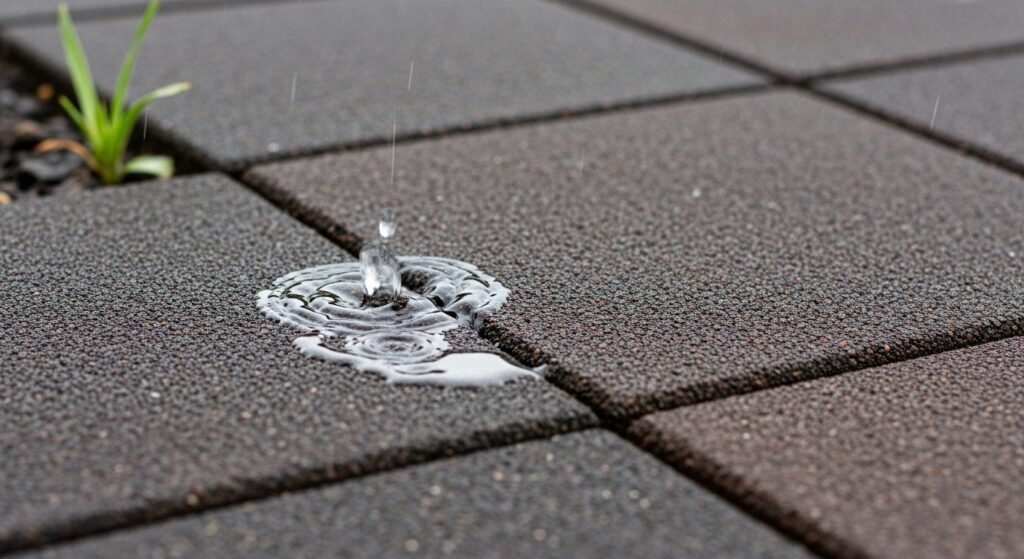
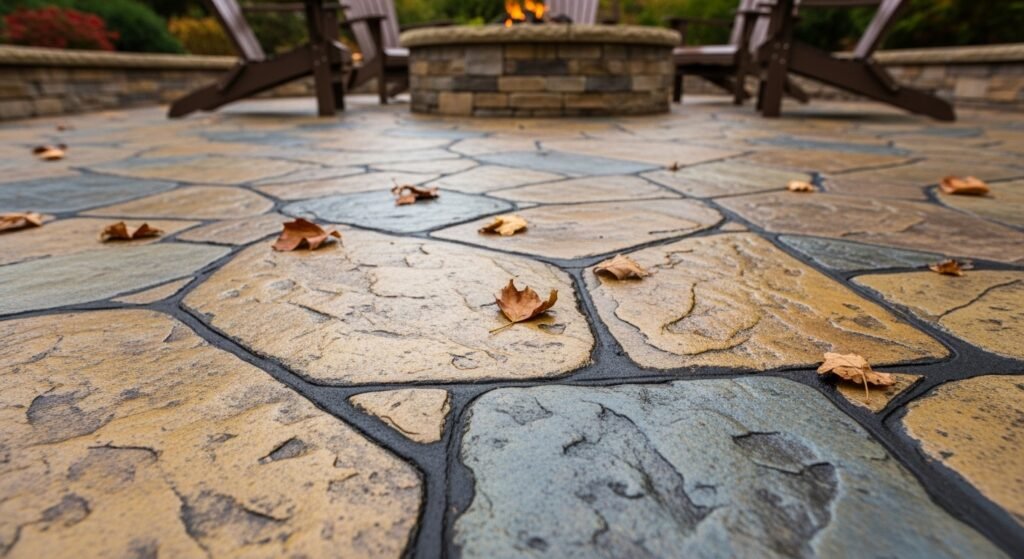
If you want a stone look, resilient pavers are the way to go. These are often made from high-density recycled materials like old tires. They are very tough and can handle a lot of walking. They stay in place well and feel solid under your feet. It is a great way to be eco-friendly while fixing your yard. You get a high-end look without the high-end price tag.
Comparison of Materials
Picking between wood-look and stone-look is a tough choice. Think about what matches your house the best. Both options work great as outdoor patio flooring over concrete. Composite boards give a classic deck feel that people love. Pavers give a more modern or rustic stone vibe. Look at your outdoor furniture and see what fits.
Maintenance
- Low Work: NewTechWood and Aspire Pavers are very easy to keep clean.
- No Staining: You do not have to sand or paint these every single year.
- Simple Wash: Just use a hose or some soap to keep them looking fresh.
Installation Speed
Modular systems are built for speed and ease. They use a puzzle-piece design that saves you a lot of time. You can finish a whole patio in just one afternoon if you move fast. There is no need for big screws or messy glue most of the time. This makes it a perfect task for a weekend warrior. You spend less time working and more time chilling.
Sustainability
Being green is a big deal for many homeowners today. Many of these flooring options use post-consumer recycled content. Some paver systems are made of up to 95% recycled stuff. It feels good to know you are helping the planet while you build. You are keeping junk out of landfills and making your home look great. It is a win for you and a win for nature.
Design Idea 1: The Modern Wood-Look Deck Overlay
A wood deck is a classic dream for many people. But building a real deck on top of concrete is hard. That is where the floating deck concept comes into play. You lay the floor right on top of the cement slab. This gives you that expensive look for way less money. It is a smart way to get the deck you always wanted.
The Floating Deck Concept
- No Big Joists: You do not need a heavy wood frame to hold the boards up.
- Low Profile: The floor stays low so you do not trip going inside.
- Cost Saver: You save a ton of money on building materials and labor.
Material Choice
Using NewTechWood or a snap-in system makes this project a breeze. These composite decking boards look just like real wood. They come in different colors like brown, gray, or red. You can pick the one that matches your home’s style. The boards are strong and will not give you splinters. It is a safe choice for kids and pets to run around on.
The Clean Aesthetic
A wood overlay creates a seamless transition from your house to the yard. It makes the patio feel like an extra room instead of a sidewalk. The lines of the boards can make a small space look much bigger. You get a clean and organized look that is very modern. It is the perfect backdrop for your outdoor dining area. Your patio will look like it belongs in a magazine.
Design Idea 2: The Classic Brick Pattern Layout
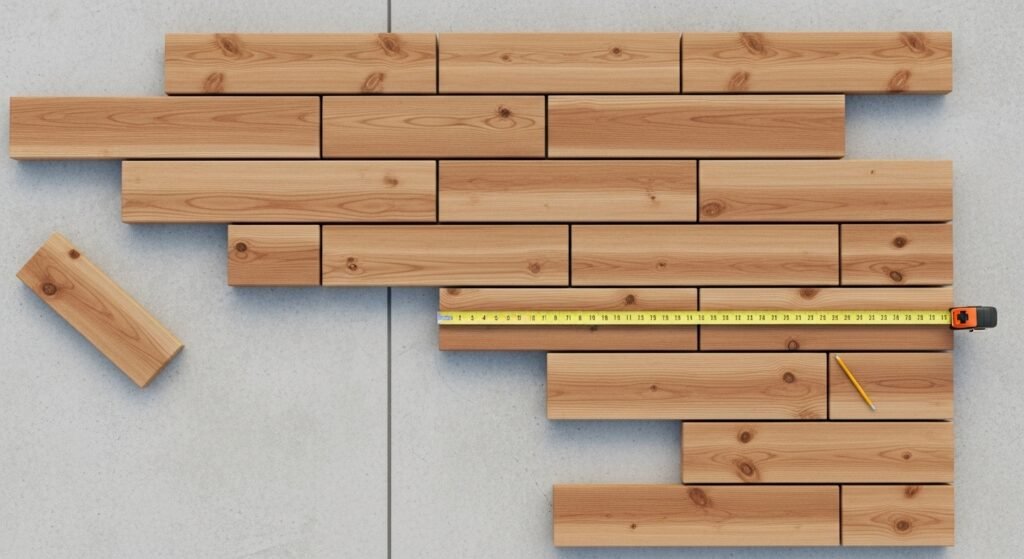
If you want your deck to look authentic, use a brick pattern. This means you stagger the boards so the ends do not line up. It creates visual interest that catches the eye. This is a pro move that makes your DIY project look like a pro did it. It takes a little more planning but the payoff is huge. Your outdoor patio flooring over concrete will look amazing.
Visual Interest
- Staggered Joints: This mimics the look of a real, high-end timber deck.
- Depth: The pattern adds a sense of depth and movement to the floor.
- Unique Style: It breaks up the flat look of the boards for a better vibe.
Structural Detail
The brick pattern is often called the definition of handyman quality work. It shows you put in the effort to make it look right. This layout also helps keep the floor stable and strong. By spreading out the joints, you create a more solid surface. It handles weight better when you put heavy furniture on it. It is a solid choice for any backyard renovation.
Installation Tip
To get this look, you will need to do some cutting. You will have to cut edge pieces to fit the pattern on the sides. A good saw is your best friend for this part of the job. Make sure you measure twice so you do not waste any boards. Keeping the staggered rhythm is key to making it look professional. It is worth the extra few minutes of work.
Design Idea 3: Geometric and Artistic Paver Patterns
Pavers allow you to get really creative with your space. You can move away from simple lines and try something bold. Geometric designs are a big trend in modern homes right now. They add an artistic flair that is hard to get with wood. You can make your patio a true work of art. It is all about how you lay them down.
The Modern Minimalist
- Linear Layouts: Use straight lines for a very clean and simple look.
- Solid Colors: Stick to one or two tones for a sleek and organized feel.
- Open Space: This style makes the area feel calm and not too busy.
Intricate Geometric Designs
Using modular grids makes it easy to create complex shapes. You can do zig-zags or squares within squares. This adds a lot of personality to your outdoor living space. It makes the floor the star of the show in your backyard. People will ask how you did such a cool design. It is a great way to show off your creative side.
Customization
You can mix different paver sizes to create a non-repeating pattern. This gives a more natural and organic look to the patio. You are not stuck with just one size or one color. You can build something that is truly one of a kind. This level of customization is what makes pavers so popular. Your patio will be different from every other house on the block.
Design Idea 4: Permeable and Eco-Conscious Flooring
Water can be a big problem for a concrete patio. If it rains a lot, you might get puddles that sit for days. Permeable pavers are a smart fix for this issue. They allow water to drain through the floor and into the ground. This is a great way to handle water drainage on your property. It keeps your patio dry and ready for fun.
The Permeable Advantage
- No Puddles: Water goes through the pavers instead of sitting on top.
- Less Runoff: It helps prevent big streams of water from hitting your lawn.
- Cleaner Floor: Mud and dirt are less likely to sit on the surface.
Sustainable Style
These pavers are often made from recycled tires and plastic. Choosing them shows you care about the environmental impact of your home. It is an eco-friendly choice that does not sacrifice style. You get a durable floor that is also kind to the earth. It is a perfect match for a modern, green home. Your backyard will look great and stay sustainable.
Visual Texture
The porous nature of these pavers adds a unique matte finish. They have a different texture than smooth cement or plastic. This adds a layer of safety because they are often slip-resistant. They look great even when they are wet. The texture helps hide small bits of dirt or dust. It is a very practical and stylish choice for any family.
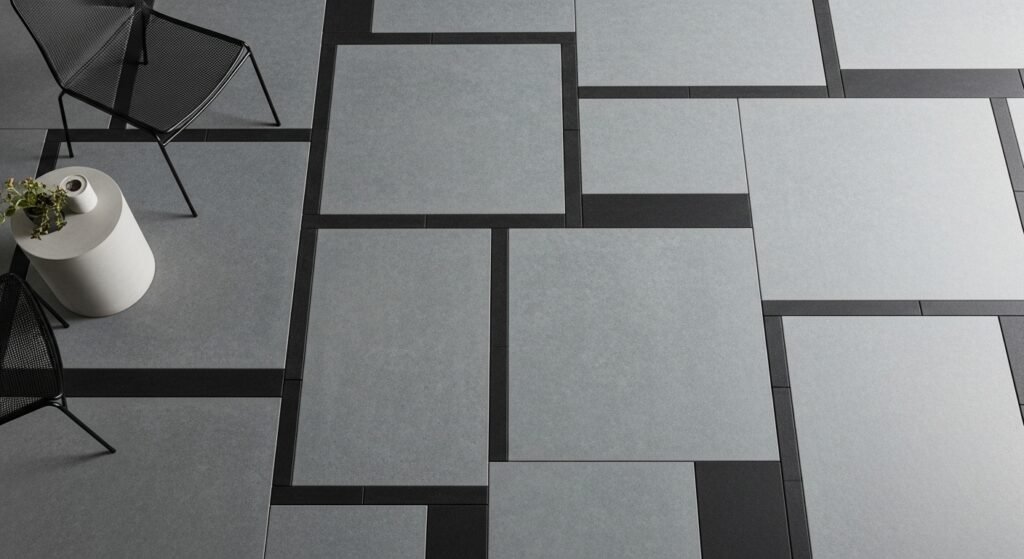
Design Idea 5: High-Contrast “Framing” and Bordering
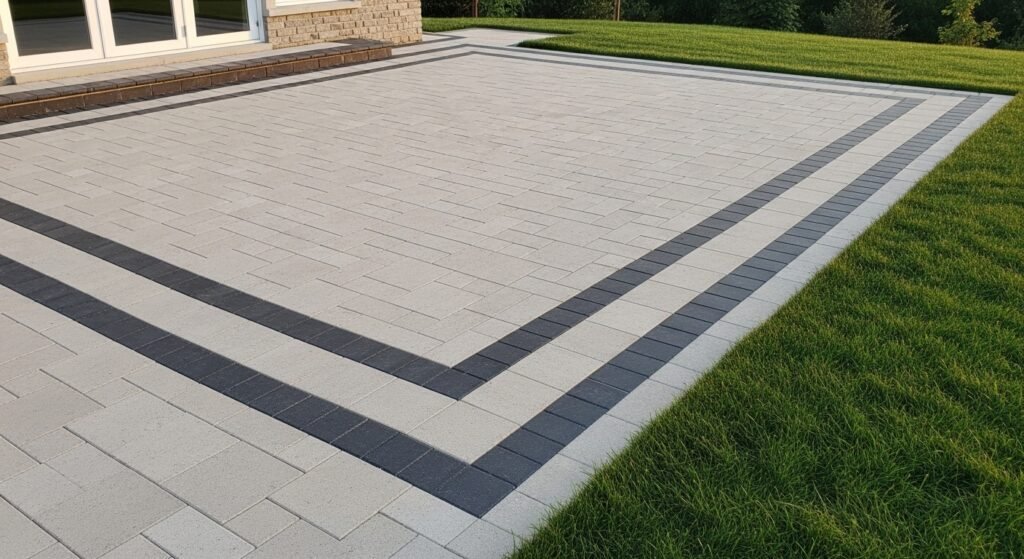
Framing is a technique where you use a different color around the edges. It is like putting a picture frame around your patio. This defines the space and makes it look very high-end. It is a simple trick that adds a lot of value to the design. You can use it to separate the patio from the grass. It makes the whole area look very organized.
The Frame Technique
- Contrast: Pick a darker or lighter color for the outside edge.
- Structure: It gives the patio a clear start and finish line.
- Pro Finish: It hides the ends of the boards or pavers for a clean look.
Defining Spaces
Borders are perfect for outlining specific functional areas. You can make a circle of pavers for your fire pit. Or you can frame a square for your outdoor dining area. This helps people know where to walk and where to sit. It makes a large patio feel like it has different rooms. It is a great way to plan your outdoor retreat.
Clean Edges
Framing provides a professional look to the perimeter of your slab. It covers up any uneven edges of the concrete underneath. This is especially good if your old patio is a bit crumbly at the sides. You get a crisp and clean line all the way around. It makes the landscaping around the patio look much better too. Your yard will look tidy and well-planned.
Design Idea 6: Bold Colorful Accents and Mixing Tones
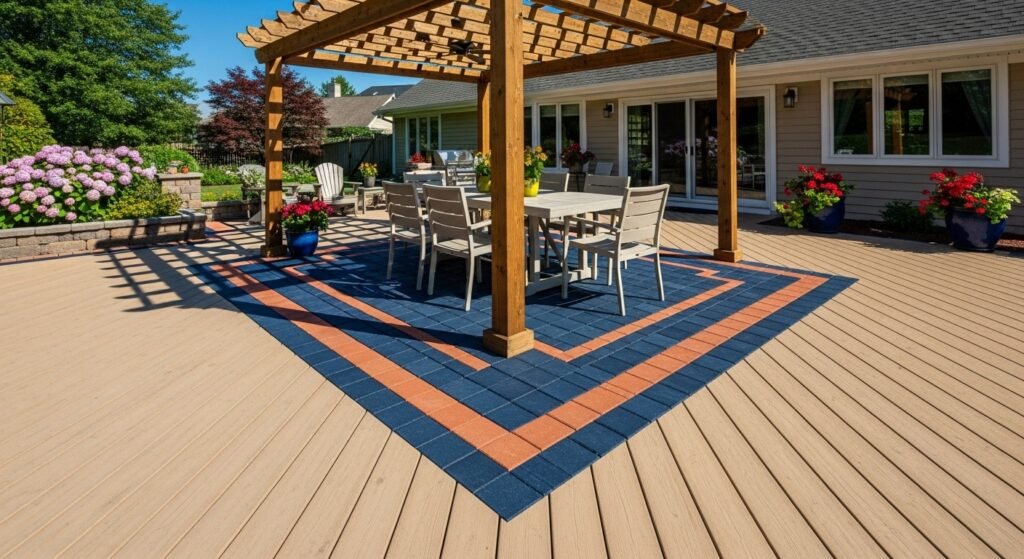
Who says a patio has to be brown or gray? You can use bold colors to make the space pop. Moving beyond neutral tones is a fun way to express yourself. You can mix and match various paver hues for a custom look. This adds a lot of energy to your outdoor oasis. It is your yard, so don’t be afraid to use some color.
Vibrant Palettes
- Mix and Match: Use different shades of the same color for a deep look.
- Bold Choices: Add a splash of blue or red for a unique artistic flair.
- Custom Vibe: You are not limited to what the store tells you to do.
The Outdoor Rug Look
You can use a secondary color in the center to mimic a textile rug. This is a huge trend in outdoor design right now. It anchors your outdoor furniture and makes the space feel cozy. Since it is made of pavers, you never have to worry about it getting wet. It looks like a luxury rug but lasts for years. It is a brilliant way to use outdoor patio flooring over concrete.
Mood Creation
Warmer tones like reds and browns create a cozy lounge space. Cooler tones like grays and blues fit better with modern style. You can use color to set the mood for your parties. Think about how you want people to feel when they are on your patio. Light colors can make a small area feel bigger and brighter. Dark colors can make a large space feel more private.
Design Idea 7: Multi-Level and Zoned Transformations
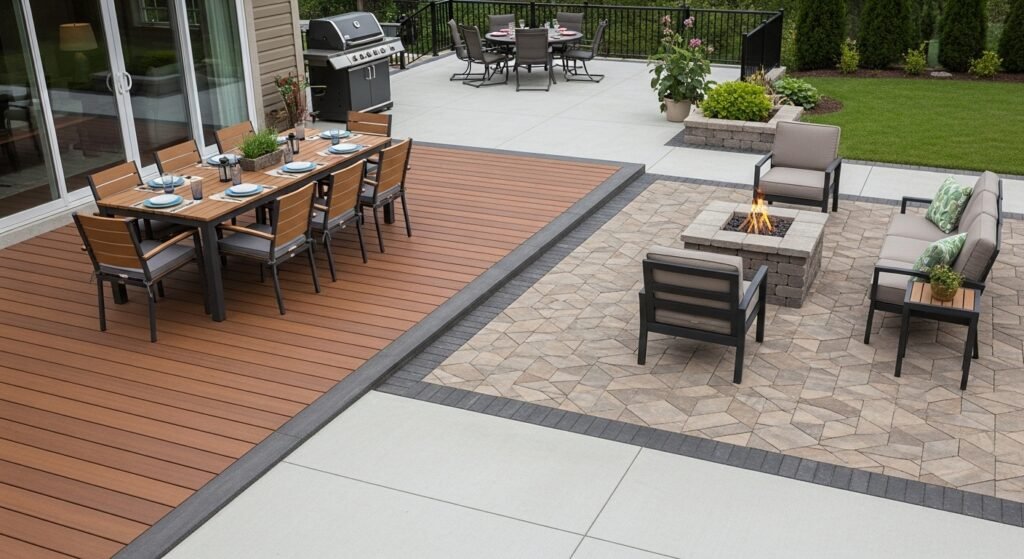
If you have a big yard or a weird slope, try multi-level designs. This adds a lot of depth to your backyard. You can use different materials to show where one area ends and another starts. This makes a small concrete slab feel like a much larger space. It is all about how you manage the elevations of the floor. This is a top-tier design move for any home.
Managing Elevations
- Steps: Use flooring to create small steps between different areas.
- Visual Cues: Different patterns can show people where to step up or down.
- Tiered Look: It makes your backyard look more expensive and complex.
Zoning for Function
The lounge zone should have warm wood-look composites for a cozy feel. The activity zone needs durable and slip-resistant pavers. By using different floors, you tell your guests what each area is for. One spot is for eating, and another is for playing with the dogs. This keeps your patio organized even when it is crowded. It is a smart way to use every inch of space.
Space Maximization
Defining zones makes a small patio feel like a multi-room living area. It tricks the eye into thinking there is more room than there really is. You can fit a dining table, a grill, and a couch all in one spot. Each “room” has its own floor style to keep things separate. This is the best way to handle a small backyard renovation. You get more out of your space without adding more concrete.
Design Idea 8: Stamped, Stained, and Textured Overlays
Sometimes you do not want to add thick boards or pavers. You might want to fix the concrete you already have. This is where resurfacing comes into play. You can use stamps to make wet cement look like stone or wood. It is a budget-friendly way to get a luxury look. You get to keep the strength of the slab while changing the style.
Mimicking Luxury Materials
- Slate Look: Stamps can make your patio look like expensive slate.
- Natural Stone: You can get the texture and shape of real rock.
- Cobblestone: Create a rustic charm that looks like an old street.
The Power of Color
Staining concrete adds depth and variegated color to the surface. This means the color is not just one flat tone. It has light and dark spots that look like natural stone. It is a very cool look that is also very durable. You can choose from many different colors to match your house. It is an easy way to hide old stains on the floor.
Textured Safety
Textured overlays add slip-resistance to the patio while looking premium. This is super important if you have a pool or if it rains a lot. You do not want anyone falling on a wet floor. The texture also adds a lot of style and character. It feels more like real stone than smooth cement. It is a safe and pretty choice for any outdoor living space.
Comparison of Concrete Patio Design Ideas and Materials
| Design Idea | The Look & Aesthetic | Primary Materials Used |
| Modern Wood-Look Overlay | A seamless, high-end “floating” deck appearance that mimics traditional timber. | Composite “snap-in” boards (e.g., NewTechWood) and plastic grid systems. |
| Classic Brick Pattern | Staggered joints that provide architectural depth and a professional “handyman” finish. | Wood-plastic composite (WPC) boards and stainless steel or plastic clips. |
| Modern Minimalist | Sleek, clean lines with a focus on simplicity and organized open space. | Large-format linear pavers or monochromatic composite decking. |
| Geometric & Artistic | Intricate, mosaic-style patterns with complex shapes and artistic flair. | Multi-sized resilient pavers and modular interlocking grids. |
| Permeable Eco-Flooring | A matte, textured finish that looks organic and functional. | High-density recycled rubber pavers (Aspire) and drainage grids. |
| High-Contrast Framing | A defined, “pictured-framed” perimeter that looks polished and intentional. | Two contrasting colors of pavers or boards; edge fascia/reducer strips. |
| Outdoor Rug Aesthetic | A central focal point using colors and patterns to mimic a textile carpet. | Dual-tone pavers or composite boards in a central “inset” layout. |
| Multi-Level Zoned | A tiered, multi-room feel that separates dining, lounging, and activity areas. | A mix of composite decking for lounges and durable pavers for high-traffic zones. |
| Stamping & Staining | Mimics expensive natural stone, slate, or European cobblestone. | Wet concrete, decorative stamps, and chemical/acid-based stains. |
| Textured Overlays | A premium, slip-resistant surface with variegated colors mimicking natural rock. | Thin-set cementitious overlays and sand-infused sealants. |
Technical Execution: The Modular Installation Process
Now it is time to get your hands dirty and start the work. Most of these systems follow a simple step-by-step process. You do not need to be a pro builder to get it right. Just follow the guide and take your time. Before you know it, your patio will be done. This is the most rewarding part of any DIY tutorial.
Phase 1: Preparation
First, you have to clean the slab really well. Get rid of all the dirt, moss, and old leaves. Use a hose or a power washer to make it shine. Check for any big cracks that might cause trouble. You want a nice, flat surface before you start laying things down. Proper preparation makes the rest of the job much easier.
Phase 2: The Foundation
Next, you lay out the grid pieces across the concrete. These grids act as the subfloor for your new patio. Then, you snap in the clip-in accessories where the boards will go. This is like setting up the skeleton of your new floor. Make sure everything is lined up straight from the beginning. This part goes fast once you get the hang of it.
Phase 3: The Surface
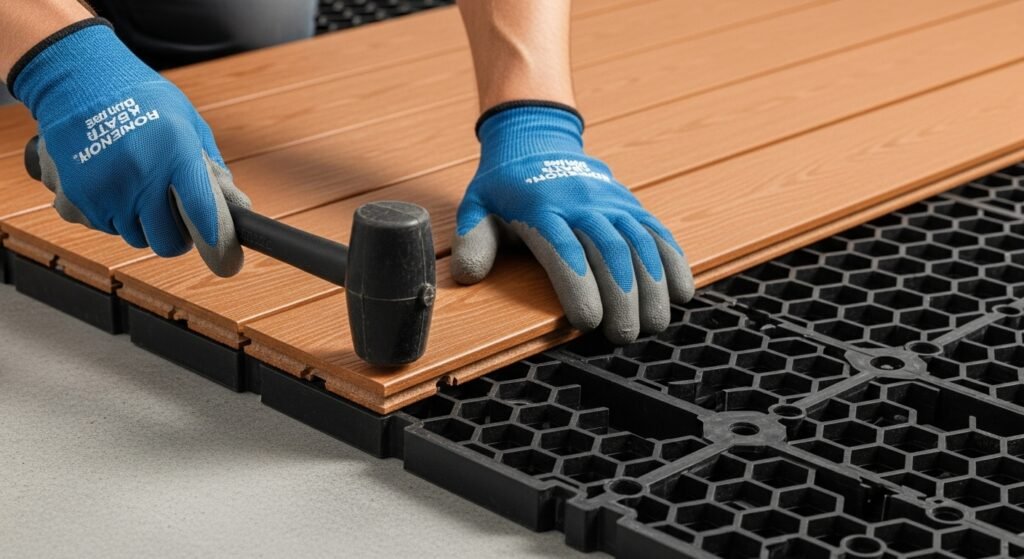
Now for the fun part: clicking the boards or pavers into place. This snap-and-lock method is very user-friendly. You just push them down until they click into the clips. One by one, your new floor starts to appear. It is like watching a puzzle come together in front of you. You can see the transformation happening in real time.
Phase 4: Precision Finishing
Finally, you will need to do some precision finishing. Use a miter saw or a jigsaw to cut boards for the edges. You might have to cut around posts or the side of the house. This is where you make sure everything fits perfectly. Once the last board is in, your patio is ready to go. You just finished a major home improvement project!
Maintenance and Long-Term Care
Once your new floor is down, you want it to stay pretty. Luckily, these materials are built to last. They are much easier to care for than old concrete or real wood. You do not have to spend all your time working on it. A little bit of care goes a long way. This keeps your outdoor patio flooring over concrete looking new.
Easy Cleaning
- Simple Wash: Just use some water and a broom to get rid of dirt.
- Soap and Water: For tougher spots, a little soap usually does the trick.
- Low Maintenance: You do not need expensive cleaners or chemicals.
Durability for Pets
These surfaces are great for dogs who love playing in the dirt. They are tough enough to handle claws and running around. If your pet makes a mess, you can just hose it off. They are also safe and do not have splinters like wood might. Your furry friends will love the new patio as much as you do. It is a durable choice for any animal-loving home.
Longevity
Modern overlay systems have great UV resistance. This means the colors will not fade away in the bright sun. They are also weather-resistant and can handle rain, snow, and heat. Most systems are built to last for many years without needing a fix. You can trust that your hard work will stay looking great. It is a smart investment for your backyard.
Final Touches: Decorating Your New Floor
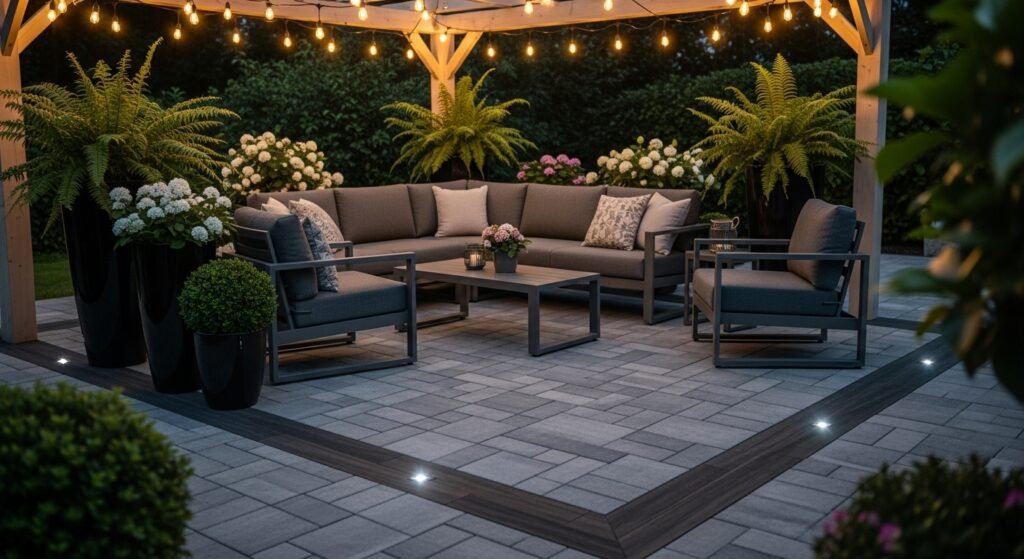
The hard work is done, so now it is time for the fun stuff. Decorating your new patio is the best part. You can pick out furniture and lights that make the space look amazing. This is where you turn a floor into an outdoor living room. Think about how you will use the space every day. It is time to create your perfect outdoor retreat.
Furniture Integration
- Match Tones: Pick colors that go well with your new flooring.
- Comfort First: Get a nice sectional or some chairs for lounging.
- Dining Set: Add a table if you want to eat outside with family.
Lighting
Adding string lights can make your patio look magical at night. You can also add deck lighting into the boards themselves. This highlights the textures of the new floor when the sun goes down. It makes the space safe for walking around in the dark. Good lighting changes the whole mood of the backyard. It is the perfect finishing touch for your new oasis.
The Reveal
Compare the before and after to see the total transformation. You went from a cringe-worthy gray slab to a luxury outdoor space. It is a huge change that you should be proud of. Now, go grab a drink and sit on your new patio. You earned it after all that work. Enjoy your new outdoor patio flooring over concrete for years to come.
Frequently Asked Questions
Can I install outdoor patio flooring over concrete that is uneven?
Minor dips can often be ignored, but major humps or large cracks should be leveled with a self-leveling concrete compound first. This ensures the modular grids sit flat and prevents the finished surface from bouncing or clicking when walked upon.
Does the concrete need to be sealed before installing an overlay?
It is not required, but applying a basic silane-siloxane sealer can help prevent moisture from seeping into the slab and causing “efflorescence” (white salty stains) that might eventually peek through the edges of your new floor.
How do I prevent mold from growing under the new flooring?
Ensure the concrete has a slight slope for water runoff. Most modular systems like NewTechWood have built-in channels in the grid to allow airflow and water drainage, which naturally prevents mold and mildew buildup.
Will the new flooring affect the height of my door threshold?
Most snap-in systems add about 1 to 2 inches of height. Always measure the distance between your concrete slab and the bottom of your door to ensure the door can still open freely after the outdoor patio flooring over concrete is installed.
Can I put a heavy hot tub on top of composite deck tiles?
Standard composite tiles are not rated for the concentrated weight of a filled hot tub. You should place the hot tub directly on the concrete slab and install the decorative flooring around it for a “recessed” look.
How do I handle the edges if the concrete patio is curved?
For curved edges, use a jigsaw with a fine-tooth blade to trim the composite boards or pavers along the radius. You may need to use a flexible trim or border stones to hide the exposed edges of the concrete and the grid foundation.
Can I install these systems over a wood deck instead of concrete?
Yes, most modular grid systems work on any flat, hard surface. However, you must ensure the wood underneath is in good structural condition and has proper ventilation to prevent rot.
Do composite boards expand and contract?
Yes, composite materials expand when hot and shrink when cold. When installing, leave a small gap (usually 1/8 to 1/4 inch) near walls or fixed structures to allow the material to move without buckling.
Can I use a pressure washer on my new patio floor?
You can use a pressure washer on a low setting (below 1,500 PSI). Using a high-pressure tip too close to the surface can etch the material or damage the wood-grain texture of composite boards.
What happens if a single tile or board gets damaged?
One of the best perks of modular outdoor patio flooring over concrete is that it is repairable. You can pop out the specific damaged piece and snap in a new one without tearing up the entire patio.
Are these flooring options fire-resistant for use under a grill?
Most are fire-rated but not fireproof. It is highly recommended to use a grill mat under any cooking station to protect the floor from hot embers, grease splatters, and heavy heat.
Will snow and ice damage the pavers?
These systems are built to withstand freeze-thaw cycles. You can use plastic snow shovels to clear the area, but avoid metal shovels or ice picks which can scratch the surface of the pavers or composite.
Can I use rock salt or de-icers on the floor?
Check the manufacturer’s guide first. Generally, calcium chloride-based de-icers are safer than rock salt, which can leave a white residue or potentially abrade the finish over time.
How do I finish the sides of the patio if the concrete is raised?
Most systems offer matching “fascia” boards or “reducer” ramps that snap onto the edge of the grid. This hides the underside of the flooring and provides a clean, sloped transition to the grass.
Do I need to worry about weeds growing through the tiles?
Since you are installing over a solid concrete slab, weeds cannot grow up from the soil. However, dirt can collect in the cracks and allow airborne seeds to sprout. A quick hosing once a month prevents this.
Can these floors be installed in a garage?
While designed for outdoors, many people use resilient pavers in garages. However, composite deck boards are not recommended for garages because they aren’t designed to handle the twisting force of car tires.
Is the flooring slippery when it gets wet?
Modern outdoor patio flooring over concrete is engineered with high slip-resistance. Many products have a “C” rating or a textured grain that provides better grip than plain, wet concrete.
Does the color fade significantly over time?
High-quality composites and rubber pavers are UV-stabilized. While they may lighten very slightly in the first few months of “weathering,” they will not turn gray or lose their primary color like natural wood.
Can I install this myself if I’m not a professional?
Absolutely. These systems are specifically marketed to DIYers. If you can use a tape measure and a basic saw, you can successfully complete this project in a single weekend.
How long does the installation typically last?
When installed correctly over a stable concrete base, these systems typically last 15 to 25 years. This makes them one of the most cost-effective long-term upgrades for a backyard.