
Refinishing your original pine floors is a budget-friendly and eco-friendly way to modernize your home. You don’t need to replace them with expensive white oak to get a light, beachy look. With the right plan and some hard work, you can transform dated, orange boards into something beautiful. This guide covers everything from sanding to sealing, helping you avoid common mistakes and successfully renovate your space.
Introduction to Pine Floor Restoration
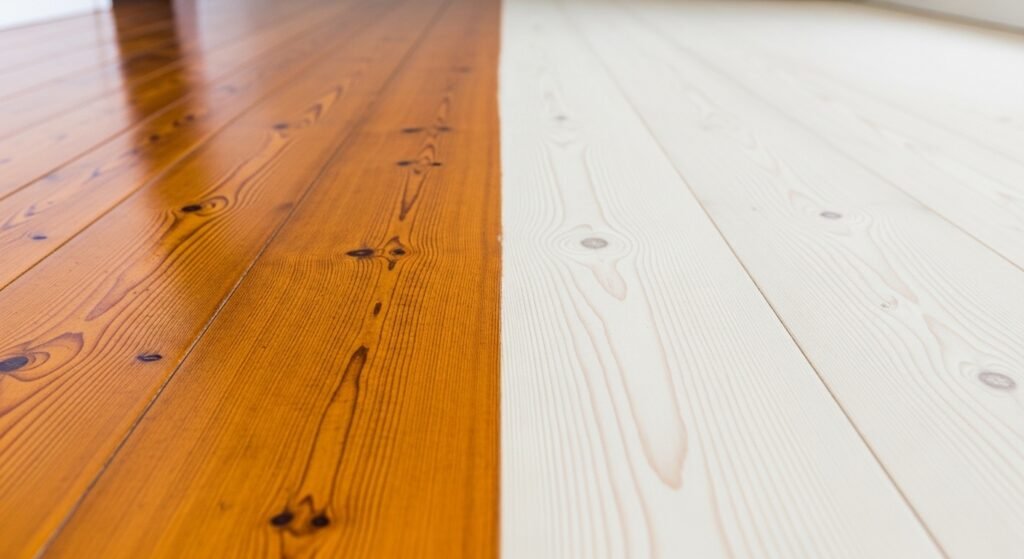
The emotional impact of uncovering original wood floors is huge. It feels like finding hidden treasure under your old flooring layers. When you pull back that dusty carpet, you see history right there. Many homeowners are moving away from those traditional dark or orange tones. They want a look that feels fresh and full of natural light. This is why refinishing pine floors has become such a massive trend lately. People want their homes to feel like a breezy coastal retreat. You do not need a fancy Florida house to get this style. Any historical house can have a stunning interior design update.
The common struggle for most people is finding the right info. Most guides online talk about oak or maple or walnut. Pine is a softwood and behaves very differently than those hardwoods. If you treat pine like oak, you might end up with a blotchy mess. It is frustrating when you search for days and find nothing helpful. You need a specific rundown of floor products made for pine. This guide is my contribution to help you save your original hardwood. Do not listen to contractors who say you should just install vinyl. Original wood has a soul that new materials just cannot match. Keeping your old floors is the best way to honor your home.
Contractors often suggest replacement because it is easier for them. They might tell you that pine is too soft to last. They might say it will always look yellow no matter what. But these are just myths that people tell to sell more flooring materials. You can actually make pine look even better than expensive white oak. It just takes a specific sealer and a high-quality topcoat. When you do it right, the wood grain really pops. You get to keep the history while getting a brand new look. It is the ultimate DIY home improvement win for any homeowner.
Understanding Your Wood Type
Regular White Pine
Regular white pine is very common in many 100-year-old floors. It is a very soft wood that feels warm under your feet. When you first sand it down, it looks incredibly pale. This is the stage where it looks most like a beachy aesthetic. It reflects a ton of natural light into the master bedroom or hallway. However, it is very sensitive to the type of finish you use. If you use a clear sealer that is oil-based, it will turn yellow fast. This is why so many old pine floors look like a basketball court.
Historic Heart Pine
Historic heart pine is a bit different from the regular stuff. It is much denser and has a lot more character. You will notice deeper red undertones in the wood grain. This wood comes from the center of very old trees. It is much harder than standard softwood varieties. When you are refinishing pine floors of this type, you have to be careful. The red tones can bleed through if you use the wrong products. It is a beautiful wood species that deserves to be saved. Even if it has some imperfections, it adds a rustic look to the room.
Old Yellow Pine
Yellow pine is famous for those heavy orange tones. Over many decades, the old oil-based sealer turns very dark. It can make a room feel small and dated. When you start your renovation project, this is usually what you see. The wood often has a lot of grime and surface wear. It can also be very blotchy when you try to add wood staining products. This happens because the wood grain has different levels of density. Some parts soak up the stain while others repel it. Understanding this is the first step to a successful floor renovation.
The Preparation Phase
Removing Old Flooring
Before you can start sanding, you have to clear the way. This usually means pulling up wall-to-wall carpeting and old padding. You will need a pry bar and a hammer for this part. Be prepared to find thousands of staples and nails in the wood. It is a tedious job, but you have to be thorough. If you miss a nail, it will ruin your sanding belts later. Take your time to check every square inch of the master bedroom and hallway.
- Clear the room of all furniture and baseboards to get a clean edge.
- Pull up the carpet in large strips using a utility knife.
- Remove the padding and any underlayment that might be stuck down.
- Extract every staple using pliers so the wood is completely smooth.
- Inspect the wood for any patch repair needs or missing boards.
The Sanding Process
Sanding is the most important part of refinishing pine floors. Since pine is a softwood, you have to be very gentle. A big drum sander can eat through the wood very quickly. If you are not careful, you can leave deep gouges. This is why many people choose to hire a professional floor refinisher. They have the experience to keep the machine moving smoothly. If you do it yourself, start with a high grit and work your way down. You want to remove the old finish without taking too much wood.
The transformation during this stage is absolutely wild. You will see the dark orange disappear and the pale wood appear. It feels like the house is finally breathing again. You might see some old marks or horizontal lines from the past. Sometimes these come from old sanding jobs that were not done right. You have to decide if you want to sand them out or keep them. Many people call these marks “character” because they show the floor’s history. Once the wood is raw, it is ready for the protective coating.
- Use a drum sander for the main areas but keep it moving constantly.
- Switch to palm sanders or an edger for the corners and sides.
- Progress through grits starting from coarse to very fine for a smooth feel.
- Vacuum everything multiple times to ensure no dust is left in the grain.
- Wipe with a tack cloth to get every tiny bit of debris off the surface.
Choosing Your Aesthetic: Light & Airy vs. Rich & Neutral
The Case for No Stain (The “Au Naturale” Look)
If you want that light look, skipping the stain is the best move. Pine is very unpredictable when it comes to wood staining. It often looks blurry or messy because of the wood species. By not using a stain, you avoid the risk of a blotchy finish. You get to keep that freshly sanded look that everyone loves. This style works perfectly with a beachy aesthetic and light furniture. It makes the whole house feel more modern and open. You are basically letting the natural beauty of the wood shine.
The Case for Neutral Staining
Some people prefer a bit more color in their floor renovation. If your heart pine is too red, a neutral stain can help. You can use something like Minwax Provincial or English Chestnut. These colors add warmth without turning the wood orange. The key is to test samples on a small, hidden part of the floor. See how the wood grain reacts to the pigment before doing the whole room. A neutral stain can help hide imperfections and match your transition strips. It gives a more traditional but updated look to the historical house.
The “Holy Grail” Product Guide
Sealers and Conditioners
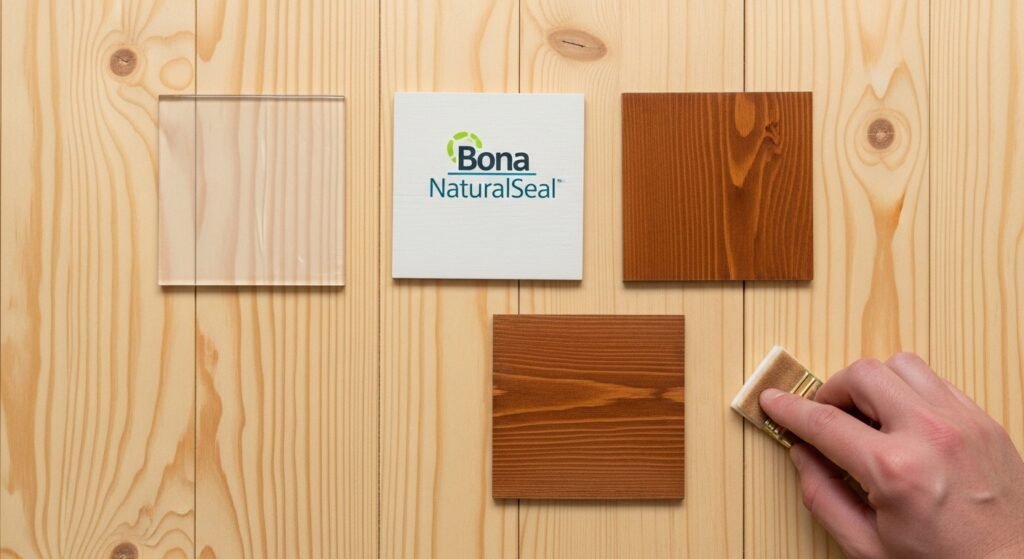
The secret to a great result is the sealer you choose. For a light look, Bona NaturalSeal is the top choice. It has a tiny bit of white tint in it. This tint counteracts the natural yellowing of the pine. It keeps the wood looking like it was just sanded. If you decide to stain, always use a pre-stain wood conditioner first. This helps the softwood absorb the color more evenly. It is a simple step that makes a huge difference in the final look.
- Bona NaturalSeal is the best way to stop the orange tones.
- Water-based sealers dry much faster than old oil-based options.
- Wood conditioner is a must if you are using a dark stain like English Chestnut.
- Sealers protect the wood from moisture before you apply the topcoat.
- One coat of sealer is usually enough to set the base for your finish.
Topcoats and Finishes
For the final layers, you need something very tough. Bona Traffic HD Commercial Satin is the gold standard for this. It is a commercial grade product that can handle a lot of traffic. It has a hardener that you mix in right before applying. This makes the finish much stronger than standard polyurethane. It also helps with wipeability, which is great for kitchens and hallways. Since it is a water-based finish, it won’t turn yellow over time. You can keep those light vibes for many years to come.
- Bona Traffic HD provides the best durability for soft pine floors.
- Apply four coats if you want the maximum protection for your home.
- Water-based topcoats are better for indoor air quality and low odor.
- The hardener makes the surface resistant to scratches from pets and kids.
- Use a lambswool applicator to get a smooth and even coat every time.
Selecting the Right Sheen
The sheen you pick changes the whole mood of the room. A satin finish is usually the favorite for most people. It has a little bit of shine but it isn’t distracting. It helps bounce natural light around the room without being too glossy. Some people try a matte finish, but it can look a bit cloudy on pine. High gloss is usually avoided because it shows every single scratch. Satin is the perfect middle ground for a clean and fresh look. It makes the floor look well-maintained and expensive.
Application and Execution
Layering for Longevity
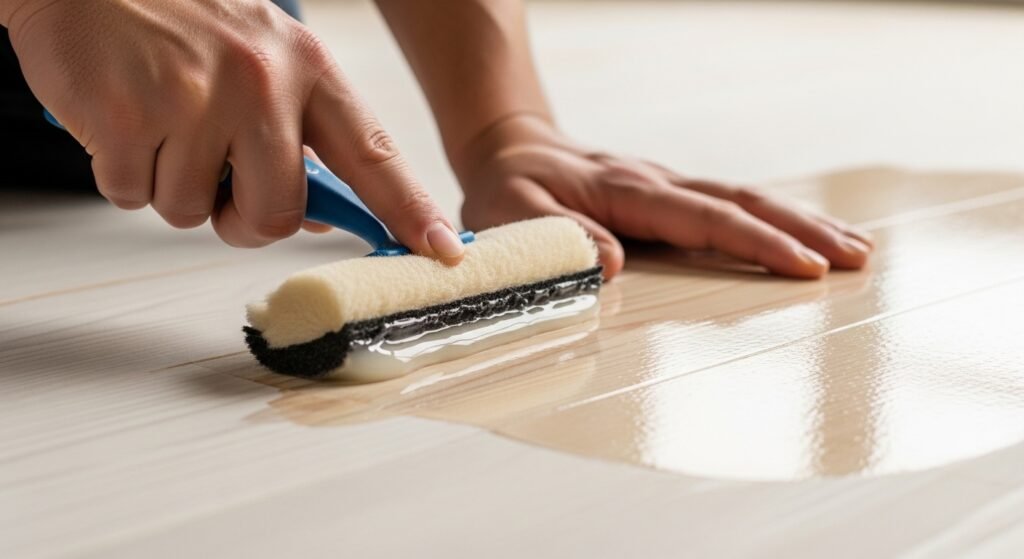
You cannot just put one coat on and call it a day. Refinishing pine floors requires multiple layers for the best result. Most experts recommend at least three to four coats of topcoat. This builds up a protective barrier over the softwood. You have to wait for each coat to dry completely before the next one. Using a fast drying product helps speed up the renovation project. It ensures that you don’t get dust trapped in the wet finish. Once it is all done, the floor will be very easy to clean.
- Start with the edges using a brush or small pad for precision.
- Pour the finish in a small line and spread it evenly with the applicator.
- Wait for the dry time specified on the bottle before walking on it.
- Buff between coats if the instructions say it is necessary for stickiness.
- Let it cure for several days before putting heavy furniture back.
Professional vs. DIY Considerations
Deciding whether to DIY or hire a pro is a big choice. Refinishing pine floors yourself can save you a lot of money. However, the machines are heavy and hard to control. If you make a mistake, it can be expensive to fix. Hiring a professional floor refinisher gives you peace of mind. They know how to handle different wood species and imperfections. They also have access to higher-grade commercial products. If you have the budget, a pro is often worth the investment. But if you are handy, a DIY project can be very rewarding.
- DIY saves money but takes a lot of time and physical labor.
- Professionals have better tools like vacuum systems that catch all the dust.
- Staining pads and palm sanders are easy for beginners to use.
- Commercial products can be tricky to mix if you have never done it.
- The risk of gouging is high for first-timers using a belt sander.
Troubleshooting and Special Considerations
Dealing with Inconsistencies
Old floors are rarely perfect, and that is okay. You might see some areas where the wood looks a bit different. This happens a lot with heart pine because of its red undertones. Some boards might be darker than others due to age. You can try to sand them more, but sometimes you just have to accept it. These inconsistencies are part of the original hardwood charm. If a spot really bothers you, an area rug is a great fix. Embracing the character of the wood makes the process less stressful.
Environmental Factors
The weather can actually affect your floor renovation. High humidity can make the wood expand and the finish dry slower. It is best to do this project when the weather is mild. Make sure your HVAC system is running to keep the air consistent. Natural light will also change how the color looks throughout the day. A color that looks great in the morning might look different at night. Keep this in mind when you are testing your stain samples.
Maintenance and Long-Term Care
Once your floors are beautiful, you want to keep them that way. Softwood like pine needs a little extra love. Use felt pads on all your furniture legs to prevent scratches. Avoid wearing high heels or heavy boots inside the house. Regular cleaning with a microfiber mop is usually all you need. Avoid using harsh chemicals that can strip the protective coating. If you take care of them, these floors will last another 100 years. It is all about protecting that gorgeous light look you worked so hard for.
- Sweep daily to remove grit that can act like sandpaper on the finish.
- Use area rugs in high-traffic spots like the front door or kitchen sink.
- Keep pet nails trimmed so they don’t leave marks in the soft pine.
- Clean spills immediately to prevent any moisture from soaking in.
- Apply a refresher coat every few years to keep the shine looking new.
Conclusion: The Beauty of Restored Pine
Refinishing pine floors is one of the best things you can do for your home. It takes a lot of work, but the payoff is incredible. You get to walk on history every single day. The light look makes every room feel bigger and brighter. You have saved a piece of the past and made it modern. Whether you went for a beachy aesthetic or a neutral brown, the wood is yours. It reflects your style and your hard work. Don’t let anyone tell you that pine isn’t worth saving. With the right sealer and topcoat, your floors are now a masterpiece.
Frequently Asked Questions
Can I refinish pine floors without a large drum sander?
While it is possible to use a smaller orbital sander, it will take significantly longer. Drum sanders are designed to remove the heavy layers of old finish and level out uneven boards efficiently. If you choose to use a smaller machine, be prepared for much more physical labor and a higher consumption of sanding pads.
How do I fix large gaps between the pine floorboards?
Gaps are common in old pine floors due to wood shrinkage over time. You can use a mix of fine sawdust from your sanding process and wood glue to create a custom filler that matches your wood perfectly. However, for very large gaps, some homeowners prefer to leave them to preserve the historic look or use rope caulk for a nautical feel.
Is it safe to refinish pine floors in a house with pets?
Yes, but you must choose a high-durability finish like the Bona Traffic HD mentioned in the guide. Softwoods like pine are more prone to claw marks, so keeping pet nails trimmed and using area rugs in high-traffic zones is essential to maintaining the surface.
How long does the smell of the finish last?
Water-based finishes have very low VOCs and the odor usually dissipates within 24 to 48 hours. If you use an oil-based sealer or stain, the smell can linger for a week or more. Proper ventilation with open windows and fans will help clear the air faster regardless of the product used.
Can I change the color of my pine floors without sanding?
This is generally not recommended for pine. “Screening and recoating” only adds a new topcoat over the old one. If you want to change the color from orange to light or brown, you must sand down to the raw wood to remove the old pigments and yellowed oils.
Will the sun fade my newly refinished floors?
Pine is sensitive to UV light and will naturally darken or “patina” over time when exposed to direct sunlight. To minimize this, you can use window treatments or UV-resistant topcoats. Periodically moving area rugs and furniture will also help the floor age evenly.
How do I handle pine floors that have been painted?
Refinishing painted pine is a messy process. You will need to use a chemical stripper first to remove the bulk of the paint, as the paint will quickly clog your sanding belts. Once the paint is gone, you can proceed with the standard sanding and sealing steps.
What should I do about “bleeding” knots in the wood?
Pine knots contain resin that can sometimes seep through the finish, causing yellow or dark spots. Using a high-quality sealer like a shellac-based primer or a specific tannin-blocker before your topcoat can help seal those knots permanently.
Can pine floors be refinished in a bathroom?
It is possible, but you must be extremely diligent about water. You should apply extra coats of a waterproof commercial-grade sealer and ensure that no standing water is ever left on the floor. Pine absorbs moisture easily, which can lead to warping if not sealed perfectly.
How many times can a pine floor be sanded?
Generally, a solid pine floor can be sanded 4 to 6 times in its lifespan. This depends on how aggressive the previous sanding jobs were. If you see the tongues of the boards or nail heads showing, the wood may be too thin for another full sanding.
Is it possible to match new pine boards with 100-year-old pine?
Matching new and old pine is difficult because the old wood has a natural aged patina. You can use wood stains to “age” the new boards, but it often takes a professional eye to mix the colors perfectly so the transition is seamless.
How do I remove black water stains from pine?
Black stains are usually a reaction between moisture and the tannins in the wood. You can use an oxalic acid solution (wood bleach) to lift these stains before you apply your sealer. Always test a small area first to ensure it doesn’t lighten the wood too much.
What is the best way to clean pine floors daily?
A simple microfiber dust mop is the best tool for daily maintenance. Avoid using steam mops, as the heat and moisture can damage the finish and cause the soft pine to swell. For damp mopping, use a pH-neutral cleaner specifically designed for hardwood.
Do I need to remove my baseboards before refinishing?
While you can sand up to the baseboards using an edger, removing them results in a much cleaner finish. If you leave them, you risk scuffing the paint with the sander or leaving a small strip of old finish at the very edge of the floor.
Can I walk on the floors during the refinishing process?
You should stay off the floors entirely during the sanding and sealing stages. Once the final topcoat is applied, you can usually walk on them in clean socks after 24 hours, but wait at least a week before bringing back heavy furniture or pets.
Why do my floors feel rough after the first coat of sealer?
This is known as “grain raise.” Water-based products cause the wood fibers to stand up. A light “inter-coat” abrasion or buffing with a high-grit screen between coats will smooth these fibers down and ensure the final result is silky.
Should I use a wood filler for small nail holes?
Yes, small nail holes should be filled after the first round of sanding. Use a stainable wood filler that matches the “raw” color of your pine so that it blends in once the sealer is applied.
How do I refinish pine stairs to match the floors?
Stairs are refinished using hand sanders and small detail tools. It is the most time-consuming part of the project. Ensure you use the exact same sealer and topcoat sequence on the treads and risers to maintain color consistency throughout the home.
Can I use a wax finish on pine floors?
Wax was common in the past, but it requires a lot of maintenance and does not offer the same protection as modern polyurethane. If you choose wax, you cannot easily switch to a polyurethane finish later without a full, deep sanding.
What is the average cost per square foot for professional refinishing?
In the USA, professional refinishing typically costs between $3 and $6 per square foot. This varies based on the condition of the floors, the type of finish used (commercial grades cost more), and the complexity of the room layouts.