
Adding built in dining room cabinets is a total game changer for your home vibe. Most houses come with that boring builder-grade look that feels a bit empty. When you add custom cabinetry, you give your space a high-end feel without needing a million bucks. These projects let you mix your own style with practical storage that every family needs. You can finally stop shoving your extra plates into random kitchen corners. This guide will show you how to nail the look and the build.
Introduction to Built In Dining Room Cabinets
Adding built in dining room cabinets is the best way to level up your house. It makes your room look like an interior designer spent weeks on it. You get to choose exactly how it looks and how much it holds. This project is perfect for making your dining area feel homey and sophisticated. It is all about making your house work better for your specific life.
- The Appeal of Customization: Custom pieces make your home stand out from every other house on the block.
- Balancing Form and Function: You get a beautiful focal point that also hides all your messy stuff.
- The Moody Design Trend: Dark colors and floor-to-ceiling units are super popular for a cozy feel.
Why Add Built In Dining Room Cabinets?
You might wonder why you should spend time on this instead of buying a shelf. The truth is that built in dining room cabinets stay with the house forever. They become part of the architecture rather than just another piece of furniture. This makes your dining room feel more expensive and well-planned. It is a smart move for your home value and your daily sanity. Plus, it just looks way cooler than a plain wall.
Custom Professional Look
Standard homes often have big, empty walls that feel a bit cold. Adding built in dining room cabinets fills that space with purpose. It takes your room from basic to bespoke in just one weekend. You can match the molding to your existing house for a seamless look. This makes the whole room feel intentional and high-end. It is the easiest way to get that custom home feel.
Maximizing Extra Storage
Storage is the number one thing most homeowners want more of. Your kitchen cabinets are probably already full of daily cereal boxes and pans. Built in dining room cabinets give you a dedicated spot for the fancy things. You can keep everything organized and within reach for dinner parties. No more digging through the garage for that one big serving platter.
- Extra storage: Perfect for those large items that do not fit in small kitchen drawers.
- Seasonal dishware: Keep your holiday plates safe and easy to find every year.
- Tablecloths: Store your linens flat so they do not get all wrinkled.
- Kitchen items: Great for stashing small appliances you only use once a month.
Eliminating Blank Space
Modern houses often have an open concept that leaves too much wall space. These big gaps can make a room feel unfinished or echoing. Built in dining room cabinets act as functional wall art. They break up the monotony of drywall with texture and depth. It makes the room feel much more grounded and solid.
Creating Visual Interest
A dining room should be more than just a table and some chairs. Built in dining room cabinets create a stunning focal point for the eye. You can use different colors or wood types to add contrast. Adding things like wainscoting or special molding makes the wall pop. It gives guests something beautiful to look at while they eat.
Increasing Home Value
When you sell your house, buyers love seeing custom upgrades. Built in dining room cabinets are considered permanent fixtures. This means they add actual value to your home appraisal. It is a much better investment than a cheap, freestanding china cabinet. People see it as a high-quality feature they do not have to build themselves.
Assessing Your Space: Will Built-Ins Work for You?
Before you run to the store, you need to check your room. Not every wall is a good candidate for built in dining room cabinets. You have to think about how people move through the space. If the cabinets are too deep, they might hit your chairs. You also need to look at where your light switches and outlets are. A little bit of planning now saves a huge headache later.
- Evaluating Layout: Make sure you have enough room for people to pull out their chairs comfortably.
- Wall Space: Measure the length and height to see what size cabinets fit best.
- Assessing Natural Light: Don’t let your new cabinets block the sun from your windows.
- Functionality Check: Think about if you need more seating or more shelf space.
- Defining the Goal: Decide if you want a dark, moody look or a bright, airy vibe.
Comprehensive Planning and Design
Planning is the most important part of any renovation. You want your built in dining room cabinets to look like they belong there. Start by looking at pictures of rooms you love. Think about what materials will look best with your current floor. You also need to decide on a budget before you buy wood. Good planning makes the building process go way faster.
Creating a Mood Board
A mood board helps you see all your ideas in one place. You can put together paint swatches, hardware styles, and wood tones. This helps you catch any design mistakes before you start building. It ensures that your built in dining room cabinets match your style. You can see if your favorite colors actually look good together.
Selecting a Color Palette
Color can totally change the way your room feels. Some people like the built-ins to blend right into the wall. Others want them to be a bold, dark statement piece. Think about how much light your dining room gets during the day. Dark colors like “Riverway” look amazing in a cozy, moody space.
- Monochromatic looks: Paint the cabinets and the wall the same color for a modern feel.
- Contrasting colors: Try black cabinetry against white walls for a high-contrast look.
- Finish types: Use a satin finish on the wood so it is easy to wipe clean.
Sizing and Proportions
Proportions are key for a professional-looking result. If your shelves are too thin, they might look cheap. If they are too thick, they can look bulky and heavy. You want your built in dining room cabinets to reach the ceiling if possible. This makes your room feel taller and more grand. Always double-check your measurements before you make any big cuts.
Types of Built In Dining Room Cabinet Structures
There are so many different ways to build these units. You can go with full cabinets, simple shelves, or even a bench. The right choice depends on what you need to store. Some people want to show off their glass china. Others just want to hide all the kids’ board games. You can even mix and match these styles for a custom unit.
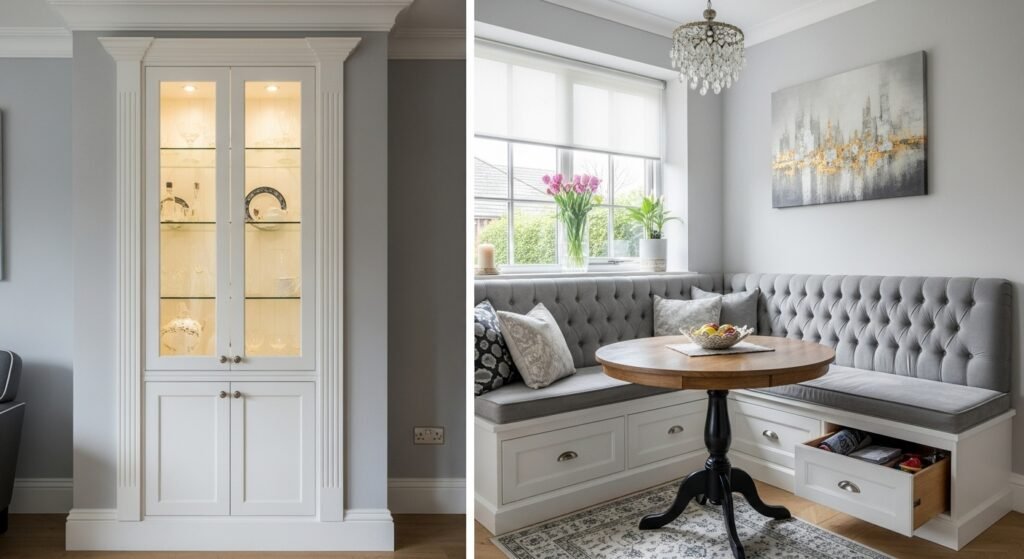
Cabinets and Hutches
These are the classic choice for a formal dining room. They give you a lot of solid storage on the bottom. You can use the top half for display or keep it closed too. These are great for replacing a dusty old china cabinet.
- Floor-to-Ceiling: These maximize every inch of your wall for a grand look.
- Glass Doors: Perfect for showing off china, vases, and wine glasses.
- Closed Cabinetry: The best way to hide messy items and stay organized.
Built-In Bench Seating and Breakfast Nooks
A built-in bench is a great way to save space. You can push the table closer to the wall with a bench. This is perfect for a small breakfast nook or a casual dining area.
- The Cozy Factor: Benches create a snug spot that kids and guests love.
- Optimal Sizing: Make sure the bench is at least 48 inches wide for two people.
- Comfort Essentials: Get a thick bench cushion so people want to sit there for a long time.
- The DIY Hack: Buy a pre-made storage bench and add trim to make it look built-in.
Open Shelving Solutions
Open shelves are very popular right now for a modern look. They feel lighter and airier than big, heavy cabinets. They are also much easier on your wallet if you are on a budget.
- Affordability: Shelves use less wood and hardware than full cabinets.
- Space-Saving: Use shallow shelves if your dining room is a bit tight.
- Recessed Shelving: Build into the wall studs to save even more floor space.
- Backdrop Customization: Add shiplap or wallpaper behind the shelves for extra style.
Essential Tools and Materials for the Build
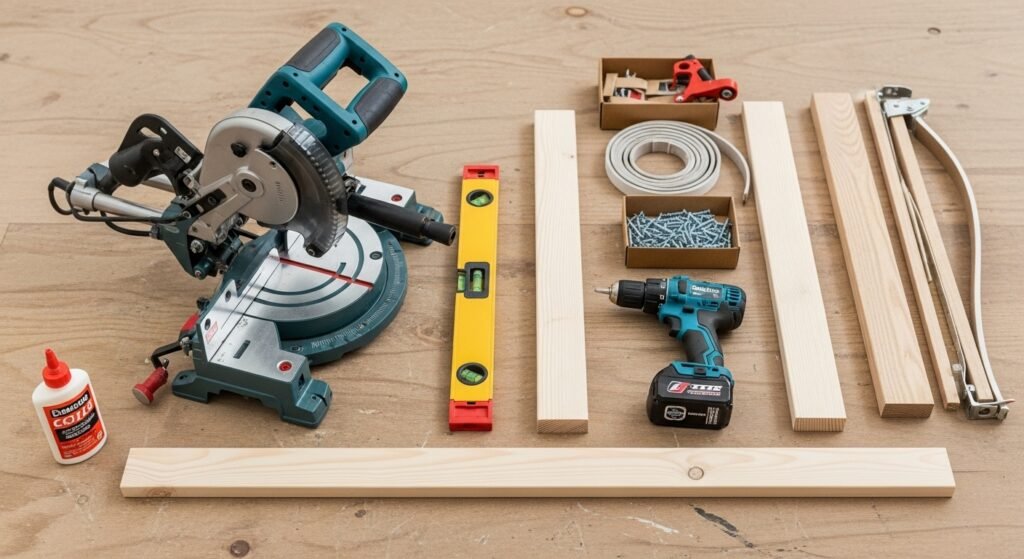
You need the right gear to get the job done right. You don’t need a professional shop, but some power tools are a must. Buying or borrowing these tools will make your built in dining room cabinets look much better. High-quality materials like primed pine and red oak also make a difference. Don’t forget your safety gear before you start cutting.
Power Tools
- Multi-tool: Great for cutting through old trim and baseboards.
- Jigsaw: Perfect for cutting holes for electrical outlets.
- Table saw: Necessary for ripping down large sheets of plywood.
- Drill: You will need this for all the screws and assembly.
Demolition and Installation Tools
- Trim puller: This helps you remove baseboards without breaking the wall.
- Hammer: Used for prying and tapping things into place.
- Level: The most important tool for ensuring your cabinets aren’t crooked.
- Step ladder: You will need this to reach the top of the shelves.
Construction Materials
- Primed pine: A great, affordable wood that is easy to paint.
- Plywood: Use this for the cabinet tops and large shelf sections.
- Wood glue: This makes your joints much stronger over time.
- Screws: Make sure you have the right lengths for different wood thicknesses.
Step-by-Step Construction Process
Building built in dining room cabinets takes a few days of work. You want to take your time and follow the steps in order. Rushing usually leads to mistakes that you have to fix later. Start with the messy demolition work first. Then you can move on to the fun part of putting it all together. Always wear your safety glasses when using your saws.
Site Preparation and Demolition
First, you have to clear the area and prep the walls. This means taking off the old baseboards where the cabinets will go. You want the cabinets to sit flush against the wall for a clean look. Use a multi-tool to cut the trim exactly where you need it.
- Removing Trim: Use a trim puller and hammer to gently pry the wood away.
- Identifying Studs: Find the wooden studs in the wall so you can screw the cabinets in tight.
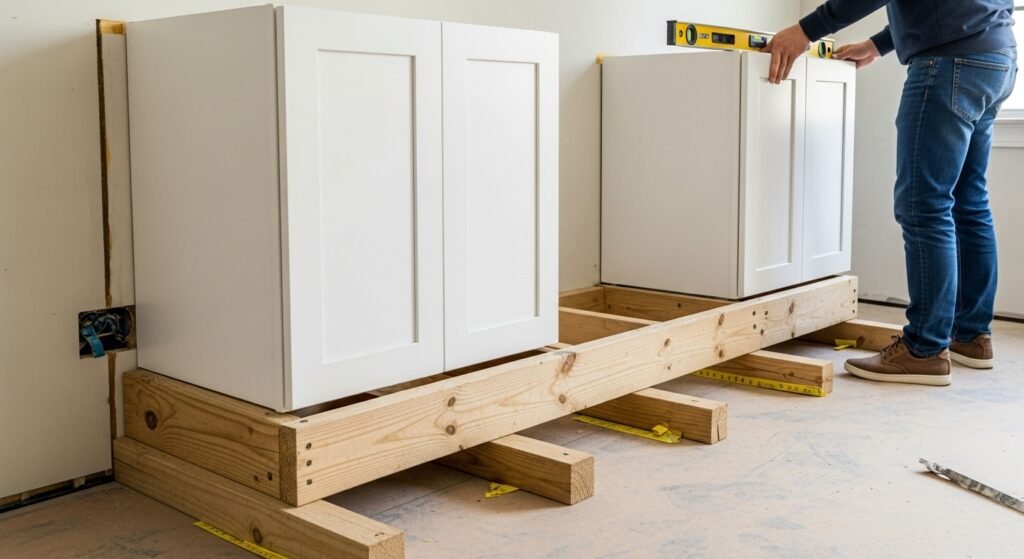
Building the Foundation
A solid base is the secret to great built in dining room cabinets. You need to build a platform that holds the weight of the units. This also raises the cabinets up so your new baseboards fit underneath. It makes the whole thing look like it was built with the house.
- Constructing the Base: Use scrap wood to make a sturdy frame on the floor.
- Leveling the Structure: Use shims to make sure the base is perfectly flat.
Cabinet and Shelf Installation
Now it is time to put the actual units in place. You can use pre-assembled cabinets from a store like Home Depot to save time. This makes the job much easier for a DIYer. Once the bottom is in, you can add the top shelving units.
- Securing the Base Units: Screw the cabinets into the wall studs so they never move.
- Constructing Bookcase Shelves: Use primed pine and wood glue to build the upper sections.
- Installing the Countertop: Glue and screw a plywood top over the base cabinets.
- Edge Banding: Apply this to the raw edges of the plywood to make them smooth.
Professional Finishing Techniques
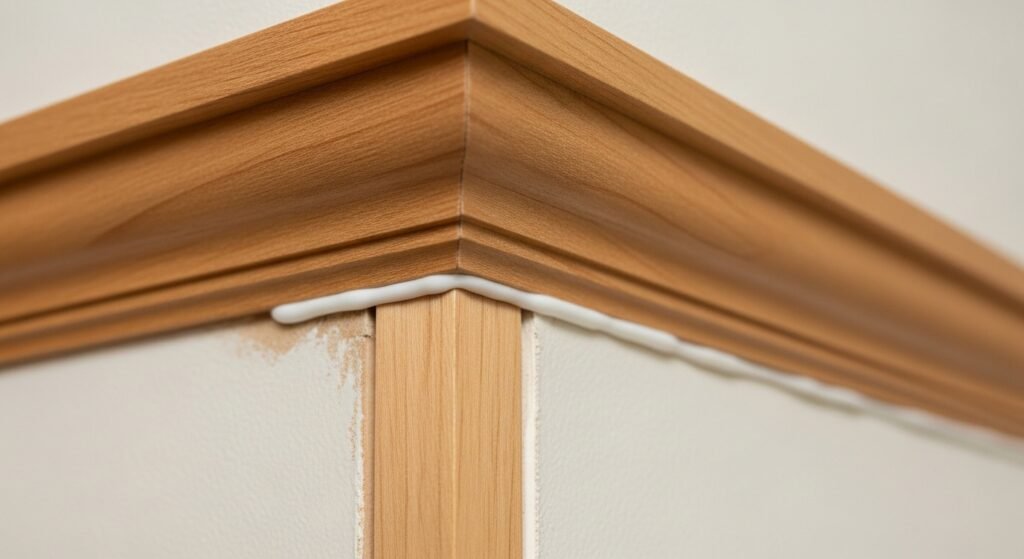
Finishing is what separates a DIY job from a professional one. You want to hide all the screws and the gaps between the wood. Face framing covers up the edges of the cabinets for a seamless look. It makes the separate pieces look like one big unit.
- Face Framing: Add thin strips of wood to the front of the shelves.
- Caulking and Wood Filling: Fill every crack and nail hole so they disappear.
- Sanding: Use a sanding sponge to get everything perfectly smooth before paint.
Painting and Aesthetic Details
Painting your built in dining room cabinets is the most satisfying part. The color you pick defines the whole room’s personality. You want to use a high-quality paint that can handle some wear and tear. A dark blue or green can make the room feel very sophisticated. Don’t forget to pick out some cool hardware to finish the look.
- Selecting Paint: Pick a color that works with your rug and furniture.
- Ceiling Coordination: Think about painting the ceiling a soft color to match the vibe.
- Hardware Selection: Brass or matte black handles can make the cabinets look modern.
Styling and Decorating Your Built-Ins
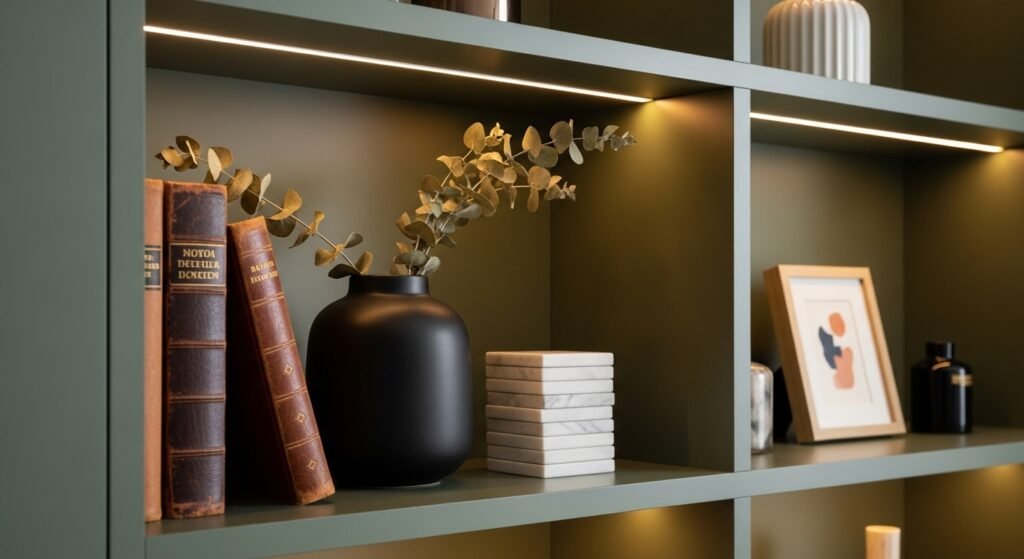
Once the paint is dry, you get to decorate your built in dining room cabinets. This is where you show off your personality. You can mix practical items with purely decorative ones. Don’t overfill the shelves, or they will look cluttered. A few well-placed items look much better than a bunch of small junk.
- Curating the Display: Group similar items together, like white pitchers or clear glasses.
- Adding Lighting: Use puck lights to highlight your favorite pieces at night.
- Seasonal Rotations: Change the decor for fall or Christmas to keep it fresh.
| Feature | Benefit |
| Closed Storage | Hides clutter and mismatched items |
| Glass Doors | Displays fine china and keeps it dust-free |
| Open Shelves | Easy access and budget-friendly |
| Built-in Bench | Saves space and adds cozy seating |
Conclusion: The Long-Term Impact of Built-Ins
Adding built in dining room cabinets is one of the best things you can do for your home. It provides huge amounts of storage and a high-end look that lasts forever. You will love having a dedicated spot for all your hosting supplies. The project might take a few weekends, but the result is totally worth the effort. Your dining room will finally feel like the heart of your home.
FAQs About Built In Dining Room Cabinets
What is the average depth of dining room built-ins?
Standard base cabinets for dining rooms are usually 12 to 18 inches deep. This is shallower than kitchen cabinets, which are typically 24 inches deep. The shallower depth ensures that you still have plenty of room to move chairs and walk around the table without the space feeling cramped.
How do I handle electrical outlets on the wall?
You should never just cover up an outlet with a cabinet back. You can use box extenders to bring the outlet forward so it sits flush with the back of the cabinet or the backsplash area. This allows you to plug in lamps, buffet warmers, or coffee makers right on the counter.
Can I install built-ins over carpet?
It is always better to cut away the carpet and install the built-ins directly on the subfloor. If you build on top of carpet, the unit may settle unevenly over time as the padding compresses. This can cause cracks in your caulking and make the unit look crooked.
What kind of wood is best for a stained finish?
If you want a natural wood look instead of paint, red oak or white oak are excellent choices. They have beautiful grain patterns and are very durable. For a more budget-friendly stained look, you can use pine, but be sure to use a wood conditioner first so the stain applies evenly.
Should I use adjustable or fixed shelves?
Adjustable shelves are great for the inside of closed cabinets so you can change them as your storage needs evolve. However, for open shelving, fixed shelves often look more high-end and stable. Fixed shelves also allow you to use thicker decorative trim on the front.
How do I make the built-ins look like they go into the ceiling?
To get a true floor-to-ceiling look, you should use crown molding that matches the rest of the room. If there is a small gap at the top, you can install a “filler” board and then attach the crown molding to that board. This hides any unevenness in your ceiling height.
Is it necessary to attach the unit to the wall?
Yes, it is a major safety requirement to anchor your built-ins to the wall studs. Large cabinetry can be very top-heavy, especially if you have glass doors or heavy stacks of plates. Screwing into the studs prevents the unit from tipping over.
What is the best lighting for the interior of glass cabinets?
LED strip lights or puck lights are the most popular options. Strip lights provide a continuous glow along the entire shelf, while puck lights create a dramatic spotlight effect. You can even find battery-powered versions if you do not want to deal with hardwiring.
Can I use IKEA cabinets as a base for my built-ins?
Many DIYers use IKEA Sektion or Billy bookcases as the “bones” of their project. You can build a custom base for them and add high-quality trim and molding to the outside. This saves a lot of time on construction while still giving you a custom finished result.
How do I choose the right hardware size?
For standard cabinet doors, a pull that is about 3 to 5 inches long usually looks best. If you have very tall pantry-style doors, you might want to go with a longer “appliance pull” to keep the proportions looking right. Always hold a sample up to the door before drilling holes.
What should I do if my walls are not perfectly straight?
Almost no walls are perfectly plumb or level. You should use “scribing” techniques, where you trim the side of the wood to match the curve of your wall. Caulking also helps fill small gaps between the wood and the wall for a clean finish.
How do I prevent the shelves from sagging?
If your shelves are longer than 30 inches, they might sag under the weight of heavy dishes. You can prevent this by using thicker plywood or by adding a solid wood “cleat” or trim piece to the front edge. This adds structural strength and prevents the wood from bowing.
Can I add a wine fridge to my dining room built-ins?
You can definitely leave a gap in your base cabinetry for a small wine or beverage cooler. Just make sure the model you buy is “front-venting.” Most standard fridges need air space around the sides, but front-venting models can be tucked tight into cabinetry.
What is the best paint finish for high-traffic built-ins?
A satin or semi-gloss finish is best because it is durable and easy to wipe down. Avoid flat or matte paints on the actual shelves or counters. Flat paint shows fingerprints easily and is very hard to clean if you spill something.
How do I handle a window in the middle of the wall?
You can build your units around the window to create a “window seat” or a bridge. This frames the window and makes it feel like a purposeful part of the design. It is a great way to add extra seating while still getting plenty of cabinet storage on the sides.
Do I need to remove the popcorn ceiling before installing?
You don’t have to remove it, but your crown molding will sit much flatter if you scrape away a small strip of the texture where the wood meets the ceiling. This prevents large gaps and makes the caulking process much easier.
Can I use MDF instead of real wood?
MDF is a popular choice for painted built-ins because it is very smooth and does not have knots. However, it is very heavy and can be damaged by water. For the base and the countertop, real plywood is usually a better, more water-resistant choice.
How do I hide the seams between two cabinets?
When you push two cabinets together, there will be a visible line. You cover this by installing a “face frame” made of thin solid wood over the front of the cabinet stiles. Once you caulk and paint the frame, the seam disappears completely.
Should I paint the back of the bookshelves a different color?
Painting the back of the shelves a contrasting color or adding wallpaper is a great design trick. It adds depth to the room and makes your decorative items stand out. It is an easy way to add a “pop” of personality to the project.
How long does a DIY built-in project typically take?
If you are working on it during the weekends, expect it to take about two to three weeks. The first weekend is for prep and construction, the second for finishing and painting, and a few extra days for the paint to fully cure before you put items on the shelves.